Getting Started With CPE Chef

NOTE: This post does NOT include any information about setting up a Chef server. There is quite a bit of documentation on Chef’s own site as well as blog posts (including my own older ones around the internet for setting up a Chef server and getting that infrastructure started. This article can be done entirely in Chef Local Mode (which obviously does not require a Chef server), or with an existing Chef infrastructure.

Introduction

Facebook has recently open-sourced a number of its Mac-specific Chef cookbooks. These are the actual tools we use to manage certain features, using Chef’s config management model. In this blog post, I’m going to discuss how to use them, how to benefit from them, and what features they offer.

Target Audience

The target for this blog post is a Mac admin with a budding interest in config management. I will endeavor to explain things in a way that does not require a deep understanding of Chef, so please don’t run away screaming if you aren’t already a user of some config management system (like Chef, Puppet, etc.).  The goal here is to show what kind of benefits we get from using a system like this that aren’t really offered by other tools.

I’m new to Chef, what do I need to know?

Unsurprisingly, there are lots of results for a Google search of “Getting started with Chef”. I’ll generally point people to the official “basic idea” documentation on Chef’s website.

For this article, let me give you a brief rundown of Chef (which I may eventually spin into a new blog post).

Chef is a config management system that is structured as a set of operations that need to happen, which then may or may not trigger based on certain other conditions you’ve specified. Ultimately, each cookbook contains a (sometimes series of) recipe(s) – which tells Chef what operations to do – that is bolstered by helper code (libraries, resources, etc.).

The API Model

At Facebook, we try to design our cookbooks using an “API model.” That model is based on the idea that you have a set of variables (in Chef, they’re called attributes) that have basic sane defaults or values, and those variables can be overridden.

Each “API” cookbook will generally not do much on its own (or at least shouldn’t do anything harmful) unless the default values in the attributes are set to something useful.

Thus, the overall idea behind Facebook Chef is that you have a series of cookbooks that each do basic management operations – such as install profiles, launch daemons, manage a specific setting, etc. – based on what other cookbooks have put into those attributes.

The basic Chef model

The basic understanding of Chef you’ll need for this blog post is about Chef’s phases.  Chef has, essentially, two primary phases, compile time and run time:

  1. Compile time – first, Chef goes through all the cookbooks and loads up all the attributes it will use (think of these as “variables” that exist throughout the Chef run).
  2. Compile time part two – Chef builds a list of all the resources (think of them as “actions” that use these attributes for data) it will need to execute, in order.
  3. Run time (a.k.a. convergence) – Chef goes through the list of resources and executes all of them in order.

Facebook’s API model, as described above, is based on the idea that most interaction with these cookbooks will be entirely based on overriding the attributes with values you want. These values are gathered at compile time, and then consumed at run time. By using this philosophy, we can make some cool implementations of dynamic management routines.

I recommend reading through the Quick Start guide on Facebook’s Github repo to get a basic idea of how to use it.

Getting Your Feet Wet

The basic structure of CPE Chef

The first place we start, using Facebook CPE Chef, is in the cpe_init cookbook. This will be the jump-off point for everything else that happens. As documented in the Quick Start guide, we’ll be using cpe_init as the cookbook that triggers all other cookbooks (which is provided by the quickstart.json file).

If you take a peek in cpe_init::mac_os_x_init.rb, you’ll see the overall cookbook run list that will actually happen – these are all the cookbooks that will run. On lines 18-22, the first item in the run list is cpe_init::company_init.rb.

company_init is where all the natural “overrides” are going to take place, where you can customize what you want to have happen on your client machines. As described in the “API model” section above, we’re going to use this recipe to set the values of the attributes to useful data, which will then be consumed by the API cookbooks during run time.

For this blog post, this will generally be the only file you’ll need or want to edit to see results.

Start with a clean slate

Let’s start with something simple. For now, take the default company_init and remove everything after line 21. You’ll need to keep lines 18-20 in order for the cpe_launchd and cpe_profiles cookbooks to function, though, and we’re going to be using them. Go ahead and replace the three occurrences of “MYCOMPANY” with whatever you want:

node.default['organization'] = 'pretendco'
node.default['cpe_launchd']['prefix'] = 'com.pretendco.chef'
node.default['cpe_profiles']['prefix'] = 'com.pretendco.chef'

QUICK CHEF TIPIn Chef parlance, node refers to the machine itself during a Chef run. node is a dictionary / hash of key/value pairs containing data about the node that will last throughout the entire Chef run. Attributes from cookbooks are stored as keys in this node object, and can be accessed the way any dictionary/hash value is normally accessed – node[key]. Attributes are normally set in the attributes::default.rb part of a cookbook. To change the value of an attribute during a recipe, you’ll need to use node.default[key]. Trying to change a value without using node.default will result in a Chef compile error.

Let’s start with a simple example – setting a profile that controls that the screensaver behavior.

Using cpe_screensaver to dynamically create a ScreenSaver profile

Controlling the ScreenSaver is relatively easy for Mac Admins – most of the relevant settings we’d want to manage can be done with a configuration profile that manages the com.apple.screensaver preference domain. Profiles are easy to install with most Mac management tools (MDM, Munki, etc.), so this is a simple win for Mac admins.

With Chef, we have a nice little toy called cpe_profiles, which allows us to dynamically specify what profiles we want installed, which are also dynamically created each time Chef runs. But we’ll get to the value of dynamic configuration soon.

The cpe_screensaver cookbook essentially does one thing – it generates a profile (in Ruby hash form) to manage the settings specified in its attributes, which is then fed to the cpe_profiles cookbook. cpe_profiles creates and installs all the profiles it was given at the end of the run.

In a bit more detail, cpe_screensaver sets up the namespace for the attributes we can override. You can see these in the cpe_screensaver::attributes file. It contains these three attributes:

default['cpe_screensaver']['idleTime'] = 600
default['cpe_screensaver']['askForPassword'] = 1
default['cpe_screensaver']['askForPasswordDelay'] = 0

QUICK CHEF TIP: The attributes file declares its attributes (and appropriate namespace) using the default[key] syntax. This both declares the existence of, and sets the default value for a node attribute, which can then be accessed during recipes with node[key], and modified during recipes with node.default[key].

For the screensaver, these three attributes correspond to keys we see in com.apple.screensaver. The idleTime attribute determines how much idle time (in seconds) must pass before the screensaver activates; the askForPassword attribute is a boolean determining whether or not unlocking the screensaver requires a password; and the askForPasswordDelay is how much time must pass (in seconds) after the screensaver locks before prompting for a password.

By default, we are mandating a value of 10 minute idle time lock, which requires a password immediately after locking.

Let’s alter these values and then do our first Chef-zero run. In your company_init.rb file, we can override these attributes:

node.default['cpe_screensaver']['idleTime'] = 60
node.default['cpe_screensaver']['askForPassword'] = 0
node.default['cpe_screensaver']['askForPasswordDelay'] = 0

Save the changes, and run Chef-zero:

cd /Users/Shared/IT-CPE/chef
sudo chef-client -z -j quickstart.json

This will initiate a “local-only” Chef run (also known as a “Chef zero” run, where it creates its own local Chef server on demand and runs Chef against it).

Some relevant snippets of Chef output:

Recipe: cpe_screensaver::default
 * ruby_block[screensaver_profile] action run
 - execute the ruby block screensaver_profile

<snip>

Recipe: cpe_profiles::default
 * cpe_profiles[Managing all of Configuration Profiles] action run
 Recipe: <Dynamically Defined Resource>
 * osx_profile[com.pretendco.chef.screensaver] action install
 - install profile com.pretendco.chef.screensaver

In the (admittedly verbose) Chef output, you’ll see the section where cpe_profiles applies the “com.pretendco.chef.screensaver”. You can also verify this in System Preferences -> Profiles and see the Screen Saver settings being managed.

Success!

How does it work?

The interaction between your company_init changes, cpe_screensaver , and cpe_profiles is the core concept behind our API model.

To understand how we got to the point of a profile being installed, let’s go through the route that the Chef took:

Compile Time

  1. Assemble recipes – cpe_init was called (thanks to the quickstart.json), which gave Chef a list of recipes to run. Among these recipes, company_init is going to be run first (as it is first it the runlist). cpe_screensaver is added to the list, and finally cpe_profiles comes last. (This order is very important).
  2. Attributes – since Chef has a list of recipes it wants to run, it now goes through all the attributes files and creates the namespaces for each of the attributes. This is where cpe_screensaver‘s attributes are created and set to default values (which are specified in the cpe_screensaver::attributes file). At the same time, cpe_profiles also creates its namespace and attribute for node['cpe_profiles'].
  3. Assemble resources – now that all the attributes have been created with their default values, Chef identifies all the resources that are going to be run. This is also where all non-resource code gets processed, including attribute overrides (anything with node.default for example). This is the point where the node attributes for cpe_screensaver  are changed by cpe_init::company_init.
    The first resource (relevant to our example) that is going to be run is that of cpe_screensaver, whose default recipe contains a ruby_block on line 16.
    cpe_profiles is last in the runlist, but it contains two resources that are going to be executed: the cpe_profiles:run default action and the cpe_profiles:clean_up action. (These are custom resources with custom actions, defined in the “cpe_profiles/resources” folder).

At the end of compile time, the resource run list will look like this:

  • cpe_screensaver::ruby_block
  • cpe_profiles::run
  • cpe_profiles::clean_up

Run Time

  1. Run the cpe_screensaver ruby_block – the resource run list is executed in order, and first in the list is this block.
    This ruby_block essentially does one thing – it creates a Ruby hash that will be used to create a mobileconfig plist file, and then assigns this mobileconfig plist to the cpe_profiles node attribute. In the profile payload, it sets the preference keys for the screensaver to the value of whatever is currently in the equivalent node attributes. Since those were just assigned in the company_init recipe, this profile will be created with the values we want.
  2. Run the cpe_profiles::run action – this action iterates through each object (mobileconfig plist) in the cpe_profiles node attribute(node['cpe_profiles']['com.pretendco.screensaver']), and then writes that plist to disk as a .mobileconfig file, and then installs that profile (using /usr/bin/profiles). This part of the run is where the profile is actually installed.
  3. Run the cpe_profiles::cleanup action – in this example, it won’t do anything, but this will remove any profiles matching the prefix that are currently installed but not listed in the node attribute.

This is what makes the API model powerful – the interaction of multiple cookbooks together creates the desired state on the machine. By itself, cpe_profiles doesn’t do anything to the node. By itself, cpe_screensaver doesn’t do anything to the node. Similarly, by itself, cpe_init::company_init doesn’t do anything either.

Yet, similar in concept to a “model-view-controller” design model (used throughout Apple development), it’s a chain reaction of inputs and outputs. The model is set up by the attributes of all the cookbooks, whose data is then filled in by the company_init recipe. The cpe_screensaver takes on the role of a controller in this analogy, in that it takes data from the company_init and makes useful data that it feeds to cpe_profiles. Then, the cpe_profiles recipe actually interacts with the node and installs the profiles (which would be similar to the “view”, which is where the user sees interaction happen).

Awesome! Where do we go from here?

Hopefully this covered the basic underlying concept behind the API model used by CPE Chef. What we did here is dynamically generate a ScreenSaver profile simply by overriding three attribute variables. With this kind of framework in place, we can do a lot of really cool things.

Part two coming soon!

A Grim Tableau

One of the perks of working at a huge enterprise tech company is that I get to play with expensive enterprise software. In a shining example of naive optimism, I walked into the doors of Facebook expecting relationships with great software vendors, who listen to feedback, work with companies to develop deployment methods, and do cool things to make it easy to use their software that I couldn’t even have imagined.

The horrible bitter truth is that enterprise vendors are just as terrible at large-scale deployment as educational software vendors, except they cost more and somehow listen less.

One such vendor here is Tableau, a data visualization and dashboard engine. The data scientists here love it, and many of its users tell me the software is great. It’s expensive software – $2000 a seat for the Professional version that connects to their Tableau Server product. I’ll trust them that the software does what they want and has many important features, but it’s not something I use personally. Since our users want it, however, we have to deploy it.

And that’s why I’m sad. Because Tableau doesn’t really make this easy.

Enough Editorializing

As of writing time, the version of Tableau Desktop we are deploying is 9.3.0.

We deploy Tableau Desktop to connect with Tableau Server. I’ve been told by other users that using Tableau Desktop without Server is much simpler, as users merely have to put in the license number and It Just Works™. This blog post will talk about the methods we use of deploying and licensing the Tableau Desktop software for Professional use with Server.


Installing Tableau

The Tableau Desktop installer itself can be publicly downloaded (and AutoPkg recipes exist). It’s a simple drag-and-drop app, which is easy to do.

If you are using Tableau Desktop with Tableau Server, the versions are important. The client and server versions must be in lockstep. Although I’m not on the team that maintains the Tableau Servers, the indication I get (and I could be wrong, so please correct me if so) is that backwards compatibility is problematic. Forward compatibility does not work – Tableau Desktop 9.1.8, for example, can’t be used with Tableau Server 9.3.0.

When a new version of Tableau comes out, we have to upgrade the server clusters, and then upgrade the clients. Until all the servers are upgraded, we often require two separate versions of Tableau to be maintained on clients simultaneously.

Our most recent upgrade of Tableau 9.1.8 to 9.3.0 involved this exact upgrade process. Since it’s just a drag-and-drop app, we move the default install location of Tableau into a subfolder in Applications. Rather than:

/Applications/Tableau.app

We place it in:

/Applications/Tableau9.1/Tableau.app
/Applications/Tableau9.3/Tableau.app

This allows easier use of simultaneous applications, and doesn’t pose any problem.

As we use Munki to deploy Tableau, it’s easy to install the Tableau dependencies / drivers, for connecting to different types of data sources, with the update_for relationship for things like the PostgresSQL libraries, SimbaSQL server ODBC drivers, Oracle Libraries, Vertica drivers, etc. Most of these come in simple package format, and are therefore easy to install. We have not noticed any problems running higher versions of the drivers with lower versions of the software – i.e. the latest Oracle Library package for 9.3 works with Tableau 9.1.8.

Since most of these packages are Oracle related, you get the usual crap that you’d expect. For example, the Oracle MySQL ODBC driver is hilariously broken. It does not work. At all. The package itself is broken. It installs a payload in one location, and then runs a postinstall script that assumes the files were installed somewhere else. It will never succeed.  The package is literally the same contents as the tar file, except packaged into /usr/local/bin/. It’s a complete train wreck, and it’s pretty par for what you’d expect from Oracle these days.

Licensing Tableau

Tableau’s licensing involves two things: a local-only install of FLEXnet Licensing Agent, and the License Number, which can be activated via the command line. Nearly all of the work for licensing Tableau can be scripted, which is the good part.

The first thing that needs to happen is the installation of the FLEXnet Licensing package, which is contained inside Tableau.app:

/usr/sbin/installer -pkg /Applications/Tableau9.3/Tableau.app/Contents/Installers/Tableau\ FLEXNet.pkg -target /

Licensing is done by executing a command line binary inside Tableau.app called custactutil.

You can check for existing licenses using the -view switch:

/Applications/Tableau9.3/Tableau.app/Contents/Frameworks/FlexNet/custactutil -view

To license the software using your license number:
/Applications/Tableau9.3/Tableau.app/Contents/Frameworks/FlexNet/custactutil -activate XXXX-XXXX-XXXX-XXXX-XXXX

The Struggle is Real

I want to provide some context as to the issues with Tableau licensing.

Tableau licensing depends on the FLEXnet Licensing Agent to store its licensing data, which it then validates with Tableau directly. It does not have a heartbeat check, which means it does not validate that it is still licensed after its initial licensing. When you license it, it uses up one of your counts of seats that you’ve purchased from Tableau.

The main problem, though, is that Tableau generates a computer-specific hash to store your license against. So your license is tied to a specific machine, but that hash is not readable nor reproducible against any hardware-specific value that humans can use. In other words, even though you have a unique hash for each license, there’s no easy way to tell which computer that hash actually represents. There’s no tie to the serial number, MAC address, system UUID, etc.

Uninstalling Tableau / Recovering Licenses

The second problem, related to the first, is that the only way to get your license back is to use the -return flag:

/Applications/Tableau9.3/Tableau.app/Contents/Frameworks/FlexNet/custactutil -return <license_number>

What happens to a machine that uses up a Tableau license and then gets hit by a meteor? It’s still using that license. Forever. Until you tell Tableau to release your license, it’s being used up. For $2000.

So what happens if a user installs Tableau, registers it, and then their laptop explodes? Well, the Tableau licensing team has no way to match that license to a specific laptop. All they see is a license hash being used up, and no identifiable information. $2000.

This makes it incredibly difficult to figure out which licenses actually are in use, and which are phantoms that are gone. Since the license is there forever until you remove it, this makes keeping track of who has what a Herculean task.  It also means you are potentially paying for licenses that are not being used, and it’s nearly impossible to figure out who is real and who isn’t.

One way to mitigate this issue is to provide some identifying information in the Registration form that is submitted the first time Tableau is launched.

Registering Tableau

With the software installed and licensed, there’s one more step. When a user first launches Tableau, they are asked to register the software and fill out the usual fields:

Screen Shot 2016-04-22 at 10.07.51 AM

This is an irritating unskippable step, BUT there is a way to save some time here.

The registration data is stored in a plist in the user’s Preferences folder:
~/Library/Preferences/com.tableau.Registration.plist

The required fields can be easily pre-filled out by creating this plist by prepending the field name with “Data”, as in these keys:

 <key>Data.city</key>
 <string>Menlo Park</string>
 <key>Data.company</key>
 <string>Facebook</string>
 <key>Data.country</key>
 <string>US</string>
 <key>Data.department</key>
 <string>Engineering/Development</string>
 <key>Data.email</key>
 <string>email@domain.com</string>
 <key>Data.first_name</key>
 <string>Nick</string>
 <key>Data.industry</key>
 <string>Software &amp; Technology</string>
 <key>Data.last_name</key>
 <string>McSpadden</string>
 <key>Data.phone</key>
 <string>415-555-1234</string>
 <key>Data.state</key>
 <string>CA</string>
 <key>Data.title</key>
 <string>Engineer</string>
 <key>Data.zip</key>
 <string>94025</string>

If those keys are pre-filled before launching Tableau, the fields are pre-filled out when you launch Tableau.

This saves some time for the user to avoid filling out the forms. All the user has to do is hit the “Register” button.

Once Registration has succeeded, Tableau writes a few more keys to this plist – all of which are hashed and unpredictable.

The Cool Part

In order to help solve the licensing problem mentioned before, we can put some identifying information into the registration fields. We can easily hijack, say, the “company” field as it’s pretty obvious what company these belong to. What if we put the username AND serial number in there?

<key>Data.company</key>
 <string>Facebook:nmcspadden:VMcpetest123</string>

Now we have a match-up of a license hash to its registration data, and that registration data gives us something useful – the user that registered it, and which machine they installed on. Thus, as long as we have useful inventory data, we can easily match up whether or not a license is still in use if someone’s machine is reported lost/stolen/damaged, etc.

The Post-Install Script

We can do all of this, and the licensing, in a Munki postinstall_script for Tableau itself:


#!/usr/bin/python
"""License Tableau."""
import os
import sys
import re
import subprocess
import pwd
import FoundationPlist
def run_subp(command, input=None):
"""
Run a subprocess.
Command must be an array of strings, allows optional input.
Returns results in a dictionary.
"""
# Validate that command is not a string
if isinstance(command, basestring):
# Not an array!
raise TypeError('Command must be an array')
proc = subprocess.Popen(command,
stdout=subprocess.PIPE,
stderr=subprocess.STDOUT)
(out, err) = proc.communicate(input)
result_dict = {
"stdout": out,
"stderr": err,
"status": proc.returncode,
"success": True if proc.returncode == 0 else False
}
return result_dict
def getconsoleuser():
'''Uses Apple's SystemConfiguration framework to get the current
console user'''
from SystemConfiguration import SCDynamicStoreCopyConsoleUser
cfuser = SCDynamicStoreCopyConsoleUser(None, None, None)
return cfuser[0]
tableau_dir = '/Applications/Tableau9.3/Tableau.app/Contents'
tableau_binary = "%s/MacOS/Tableau" % tableau_dir
cust_binary = "%s/Frameworks/FlexNet/custactutil" % tableau_dir
current_license = 'XXXX-XXXX-XXXX-XXXX-XXXX'
# Add in the registration data
registration = dict()
# Get the system serial number. For simplicity, this is abstracted out.
# This could be easily done by using subprocess to run:
# `system_profiler SPHardwareDataType`
# and searching for 'Serial Number'
serial = get_serial()
username = getconsoleuser()
# For simplicity, these values are hardcoded.
# You will need to have some way of looking up this information
# from your own directory source.
registration['Data.email'] = "email@domain.com"
registration['Data.first_name'] = "Nick"
registration['Data.last_name'] = "McSpadden"
registration['Data.company'] = 'Facebook:%s:%s' % (serial, username)
registration['Data.city'] = "Menlo Park"
registration['Data.country'] = "US"
registration['Data.department'] = "Engineering/Development"
registration['Data.industry'] = "Software & Technology"
registration['Data.phone'] = "650-555-1234"
registration['Data.state'] = "CA"
registration['Data.title'] = "Engineer"
registration['Data.zip'] = "94025"
# For simplicity, assume home directory in /Users
home_dir = os.path.join('/Users', username)
FoundationPlist.writePlist(
registration,
'%s/Library/Preferences/com.tableau.Registration.plist' % home_dir
)
os.chmod(
'%s/Library/Preferences/com.tableau.Registration.plist' % home_dir,
0644
)
os.chown(
'%s/Library/Preferences/com.tableau.Registration.plist' % home_dir,
pwd.getpwnam(username).pw_uid,
-1
)
info_plist = os.path.join(tableau_dir, 'Info.plist')
version = FoundationPlist.readPlist(info_plist)['CFBundleShortVersionString']
# Install the licensing agent
# install_pkg() is a convenience function to call subprocess with
# /usr/sbin/installer
# Not provided in this post.
install_pkg(
"\"%s/Installers/Tableau\ FLEXNet.pkg\"" % tableau_dir, untrusted=True
)
# Execute the binary to get current licenses (if any)
cust_output = run_subp([cust_binary, '-view'])['stdout']
if current_license in cust_output:
print "Already licensed, exiting."
print (
'Tableau-Success',
(
'Machine is already licensed. Cusactutil Stdout:%s (Username: %s, '
'Serial: %s, Version: %s)' % (cust_output, username, serial, version)
)
)
sys.exit(0)
# Activate Tableau and log failures
apply_license_cmd = [tableau_binary, '-activate', current_license]
shell_out = run_subp(apply_license_cmd)
if not shell_out['success']:
print >> sys.stderr, (
'Tableau-Fail',
(
'Applying license failed with error code: %s (Username: %s, Serial: %s, '
'Version: %s)' % (shell_out['status'], username, serial, version)
)
)
else:
# Check for fulfillment id and log results
cusactutil_stdout = run_subp([cust_binary, '-view'])['stdout']
fulfillment_id = re.search(
'Fulfillment ID: (FID[a-z0-9_]*)',
cusactutil_stdout
)
if fulfillment_id:
print (
'Tableau-Success',
(
'License activated and fulfillment id applied. %s (Username: %s, '
'Serial: %s, Version: %s)' % (
fulfillment_id.group(0), username, serial, version
)
)
)
else:
print >> sys.stderr, (
'Tableau-Fail',
(
'License activated but no fulfillment id. Cusactutil Stdout: %s '
'(Username: %s, Serial: %s, Version: %s)' % (
cusactutil_stdout, username, serial, version
)
)
)

Some Good News

The better news is that as of Tableau 9.3, by our request, there’s now a way to pre-register the user so they don’t have to do anything here and never see this screen (and thus never have an opportunity to change these fields, and remove or alter the identifying information we’ve pre-populated).

Registration can be done by passing the -register flag to the main binary:

/Applications/Tableau9.3/Tableau.app/Contents/MacOS/Tableau -register

There are some caveats here, though. This is not a silent register. It must be done from a logged-in user, and it must be done in the user context. It can’t be done by root, which means it can’t be done by Munki’s postinstall_script. It doesn’t really help much at all, sadly. Triggering this command actually launches Tableau briefly (it makes a call to open and copies something to the clipboard). It does pretty much everything we don’t want silent flags to do.

It can be done with a LaunchAgent, though, which runs completely in the user’s context.

Here’s the outline of what we need to accomplish:

  • Tableau must be installed (obviously)
  • The Registration plist should be filled out
  • A script that calls the -register switch
  • A LaunchAgent that runs that script
  • Something to install the Launch Agent, and then load it in the current logged-in user context
  • Clean up the LaunchAgent once successfully registered

The Registration Script, and LaunchAgent

The registration script and associated LaunchAgent are relatively easy to do.

The registration script in Python:


#!/usr/bin/python
"""Register Tableau with a pre-filled Registration plist."""
import os
import sys
import subprocess
# You'll need to get this into your path if you don't have it
import FoundationPlist
reg_plist = os.path.join(
os.path.expanduser('~'), 'Library', 'Application Support',
'com.tableau.Registration.plist'
)
if (
not os.path.exists(reg_plist) or
not os.path.exists('/Applications/Tableau9.3')
):
print "DOES NOT EXIST: %s" % reg_plist
sys.exit(1)
thePlist = FoundationPlist.readPlist(reg_plist)
keys = thePlist.keys()
if len(keys) > 12:
# Something other than the Data keys is present, so it's registered
sys.exit(0)
cmd = [
'/Applications/Tableau9.3/Tableau.app/Contents/MacOS/Tableau',
'-register'
]
proc = subprocess.Popen(cmd, stdout=subprocess.PIPE, stderr=subprocess.PIPE)
(out, err) = proc.communicate()
print out
if err:
print err

Assuming we place this script in, let’s say, /usr/local/libexec/tableau_register.py, here’s a LaunchAgent you could use to invoke it:


<?xml version="1.0" encoding="UTF-8"?>
<!DOCTYPE plist PUBLIC "-//Apple//DTD PLIST 1.0//EN" "http://www.apple.com/DTDs/PropertyList-1.0.dtd"&gt;
<plist version="1.0">
<dict>
<key>Label</key>
<string>com.facebook.tableauregister</string>
<key>LimitLoadToSessionType</key>
<array>
<string>Aqua</string>
</array>
<key>ProgramArguments</key>
<array>
<string>/usr/local/libexec/tableau_register.py</string>
</array>
<key>RunAtLoad</key>
<true/>
</dict>
</plist>

The LaunchAgent obviously goes in /Library/LaunchAgents/com.facebook.tableauregister.plist.

If you’re playing along at home, be sure to test the registration script itself, and then the associated LaunchAgent.

Loading the LaunchAgent as the logged in user

With the registration script and associated LaunchAgent ready to go, we now need to make sure it gets installed and loaded as the user.

Installing the two files is easy, we can simply package those up:


mkdir -p /tmp/tableauregister/Library/LaunchAgents
mkdir -p /tmp/tableauregister/usr/local/libexec
cp tableau_register.py /tmp/tableauregister/usr/local/libexec/
cp com.facebook.tableauregister.plist /tmp/tableauregister/Library/LaunchAgents/
chmod 644 /tmp/tableauregister/Library/LaunchAgents/com.facebook.tableauregister.plist
chmod 755 /tmp/tableauregister/usr/local/libexec/tableau_register.py
pkgbuild –root /tmp/tableauregister –identifier "com.facebook.tableau.register" –version 1.0 tableauregister.pkg

Import the tableau_register.pkg into Munki and mark it as an update_for for Tableau.

Now comes the careful question of how we load this for the logged in user. Thanks to the wonderful people of the Macadmins Slack, I learned about launchctl bootstrap (which exists in 10.10+ only). bootstrap allows you to load a launchd item in the context you specify – including the GUI user.

Our postinstall script needs to:

  1. Determine the UID of the logged in user
  2. Run launchctl bootstrap in the context of that user
  3. Wait for Tableau to register (which can take up to ~15 seconds)
  4. Verify Tableau has registered by looking at the plist
  5. Unload the LaunchAgent (if possible)
  6. Remove the LaunchAgent

Something like this should do:


#!/usr/bin/python
"""Load the Tableau registration launchd."""
import os
import time
import sys
import platform
import pwd
import subprocess
# You'll need to get this into your path if you don't have it
import FoundationPlist
def run_subp(command, input=None):
"""
Run a subprocess.
Command must be an array of strings, allows optional input.
Returns results in a dictionary.
"""
# Validate that command is not a string
if isinstance(command, basestring):
# Not an array!
raise TypeError('Command must be an array')
proc = subprocess.Popen(command,
stdout=subprocess.PIPE,
stderr=subprocess.STDOUT)
(out, err) = proc.communicate(input)
result_dict = {
"stdout": out,
"stderr": err,
"status": proc.returncode,
"success": True if proc.returncode == 0 else False
}
return result_dict
def getconsoleuser():
'''Uses Apple's SystemConfiguration framework to get the current
console user'''
from SystemConfiguration import SCDynamicStoreCopyConsoleUser
cfuser = SCDynamicStoreCopyConsoleUser( None, None, None )
return cfuser[0]
uid = pwd.getpwnam(getconsoleuser()).pw_uid
launcha = '/Library/LaunchAgents/com.facebook.CPE.tableauregister.plist'
cmd = [
'/bin/launchctl', 'bootstrap',
'gui/%s' % uid,
launcha
]
# Bootstrap the registration launch agent
result = run_subp(cmd)
if not result['success']:
print >> sys.stderr, ('CPE-TableauRegister: Failed to load launch agent.')
sys.exit(1)
# Wait 15 seconds for Tableau to register
time.sleep(15)
# For simplicity, I'm making an assumption about the home directory
reg_path = os.path.join(
'/Users', getconsoleuser(),
'Library', 'Preferences',
'com.tableau.Registration.plist'
)
iterations = 0
while True:
if iterations > 10:
# We waited almost a minute and it's still not registered
print >> sys.stderr, ('CPE-TableauRegister: Unregistered after 10 tries.')
sys.exit(1)
reg_plist = FoundationPlist.readPlist(reg_path)
if len(reg_plist.keys()) > 12:
# More than 12 keys means it's registered
break
time.sleep(5)
iterations += 1
# Once registered, we can remove the launch agent
# On 10.11, we can use 'launchctl bootout' to unload the launch agent first
currentOS = int(platform.mac_ver()[0].split('.')[1])
if currentOS >= 11:
unload_cmd = [
'/bin/launchctl', 'bootout',
'gui/%s' % uid,
launcha
]
result = run_subp(unload_cmd)
if not result['success']:
print >> sys.stderr, ('CPE-TableauRegister: Failed to unload launch agent.')
os.remove(launcha)

Caveats

Note that launchctl bootout only exists on 10.11, not 10.10. For Mavericks users, simply deleting the LaunchAgent will have to suffice. There’s no huge risk here, as it will disappear the next time the user logs out / reboots.

This process does make certain assumptions, though. For one thing, it assumes that there’s only one user who cares about Tableau. Generally speaking, it’s uncommon for us that multiple users will sign into the same machine, much less have multiple users with different software needs on the same machine, so that’s not really a worry for me.

Tableau themselves make this assumption. If one user installs and registers Tableau, it’s registered and installed for all user accounts on that machine. Whoever gets there first “wins.” Tableau considers this a “device” license, thankfully, not a per-user license. In a lab environment where devices aren’t attached to particular users, this may be a win because the admin need only register it to their own department / administrative account / whatever.

Another simple assumption made here is that the user’s home directory is in /Users. I did this for simplicity in the script, but if this isn’t true in your environment, you’ll need to either hard-code the usual path for your clients’ home directories in, or find a way to determine it at runtime.

Lastly, this all assumes this is happening while a user is logged in. This works out okay if you make Tableau an optional install only, which means users have to intentionally click it in Managed Software Center in order to install. If you plan to make Tableau a managed install in Munki, you’ll need to add some extra code to make sure this doesn’t happen while there’s no user logged in. If that’s the case, you might want to consider moving some of the postinstall script for Tableau into the registration script invoked by the LaunchAgent.

Putting It Together

The overall process will go like this:

  1. Install Tableau Desktop 9.3.
  2. Postinstall action for Tableau Desktop 9.3: pre-populate the Registration plist, install FLEXnet, and license Tableau.
  3. Update for Tableau Desktop 9.3: install all associated Tableau drivers.
  4. Update for Tableau Desktop 9.3: install the LaunchAgent and registration script.
  5. Postintall action for Tableau Registration: use launchctl bootstrap to load the LaunchAgent into the logged-in user’s context.
    1. Loading the LaunchAgent triggers Tableau to pre-register the contents of the Registration plist.
    2. Unload / remove the LaunchAgent.

Thus, when the user launches Tableau for the first time, it’s licensed and registered. Tableau now has a match between the license hash and a specific user / machine for easy accounting later, and the user has nothing in between installing and productivity.

What A Load of Crap

It’s frankly bananas that we have to do this.

I understand software development is hard, and enterprise software is hard, but for $2000 a copy, I kind of expect some sort of common sense when it comes to mass deployment and licensing.

Licensing that gets lost unless you uninstall it? No obvious human-readable match-up between hardware and the license number generated by hashing? Charging us year after year for licenses we can’t easily tell are being used, because there’s no heartbeat check in their implementation of FLEXNet?

Why do I have to write a script to license this software myself? Why do I have to write a separate script and a LaunchAgent to run it, because your attempt at silent registration was only ever tested in one single environment, where a logged in user manually types it into the Terminal?

Nothing about this makes sense, from a deployment perspective. It’s “silent” in the sense that I’ve worked around all the parts of it that aren’t silent and automated, by fixing the major gaps in Tableau’s implementation of automated licensing.  That still doesn’t fix the problem of matching up license counts to reality, for those who installed Tableau before we implemented the registration process. Tableau has been of no help trying to resolve these issues, and why would they? We pay them The Big Bucks™ for these licenses we may not be using. We used them at one point, though, so pay up!

This is sadly par for the course for the big enterprise software companies, who don’t seem to care that much about how hard they make it for admins. Users love the products and demand it, and therefore management coughs up the money, and that means us admins who have to spend the considerable time and energy figuring out how to make that happen are the ones who have to suffer. And nobody particularly cares.

Isn’t enterprise great?

Troubleshooting an Obscure DeployStudio Runtime Error

DeployStudio is an old hat classic ’round these parts, and many Mac admins are familiar with its foibles and idiosyncrasies. For those of you who haven’t moved on to Imagr yet, this sad story about troubleshooting DeployStudio may encourage you to hop onto the gravy train and off the failboat.

The story starts with a simple premise: my NetBoot clients would start up DeployStudio Runtime, but then would throw a repository access error when trying to mount the DS repository (which I have configured to be served via SMB):
12637256_10204432329603258_97004526_o

DeployStudio doesn’t like when this happens. It also doesn’t give you very useful information about what happens, because the repository access error triggers the “timeout until restart” countdown. If your trigger is an unforgiving number, i.e. 0 or 1 seconds, this will result in an instant reboot without you being able to troubleshoot the environment at all.

There’s nothing really useful in the log about why it failed, or how, either. Not very helpful, there, DeployStudio.

I’m troubleshooting this remotely, so I don’t have physical access to these machines. I’m doing all this relayed through messages to the local field technicians.

What we know at this point: DS Runtime can’t mount the SMB repo share.

Step 1: Verify DS’s Repo share

Simplest thing: check the server to make sure SMB is running and that DS knows about it. That’s simple enough to do in the System Preferences’ DeployStudio pane, which will show the status of the service and the address of the DS repository it’s offering.

Just for kicks, let’s try restarting the DS service.

Did that work? Nope.

Step 2: Verify SMB sharing

Okay, DS thinks it’s fine. Maybe SMB itself is freaking out?
sudo serveradmin stop smb
sudo serveradmin start smb

Let’s try mounting the share directly on another client:
mkdir -p /Volumes/DS/
mount -t smbfs //username@serverIP/DeployStudio /Volumes/DS
ls /Volumes/DS/

Works fine. Well, gee, that’s both good news and disconcerting news, because if the share works fine on other clients, why are these DS clients not mounting it?

???

So at this point, we know the SMB share works on some clients, fails on other clients, but is otherwise configured correctly on the server. We approach Hour 3 of All Aboard The Fail Boat.

Okay, just in case, let’s try rebuilding the NBI using DS Assistant. Did that fix it? Nope.

Ping test from broken client to server. No packet loss. Connection looks solid.

Telnet test from broken client to server on SMB port. It connects. No firewall, no network ACLs, no change in VLAN, no weird stuff.

Packet capture. Spanning tree set up between ports to carefully monitor traffic. Why are 60% of these clients failing to mount the share, but 40% still working?

Tear your hair out in frustration. Move on to hour 4.

A Glimmer of Hope

Time to get ugly. We need more data to determine what’s happening, and part of that is figuring out the difference between successful SMB authentications and failed ones. To see that, we need log data.

Hat tip to Rich Trouton for helpfully pointing me to this link:
http://web.stanford.edu/group/macosxsig/blog/2011/08/enable-logging-with-107-smbx-w.html

SMB logging sounds good. On 10.10, the above link is an easy solution – just unload the SMB launchd, edit the plist to add in the -debug and -stdout options, reload on the launchd, and watch the system log.

On 10.11, it’s a bit more work – your best bet would be to disable Apple’s launchd for SMB, make a copy of it with a different identifier, and load that (hat tip to @elios in MacAdmins Slack for this).

Once we’ve got logging enabled, let’s look very carefully at a success vs. a failure.
Success:


Feb 1 14:50:58 server.facebook.com digest-service[36275]: digest-request: init request
Feb 1 14:50:59 server.facebook.com digest-service[36275]: digest-request: init return domain: FACEBOOK server: F5KP60PFF9VN indomain was: <NULL>
Feb 1 14:50:59 server.facebook.com digest-service[36275]: digest-request: uid=0
Feb 1 14:50:59 server.facebook.com digest-service[36275]: digest-request netr: failed user=FACEBOOK\username DC status code c000006d
Feb 1 14:50:59 server.facebook.com digest-service[36275]: digest-request: netr failed with -1073741715 proto=ntlmv2
Feb 1 14:50:59 server.facebook.com digest-service[36275]: digest-request: od failed with 2 proto=ntlmv2
Feb 1 14:50:59 server.facebook.com digest-service[36275]: digest-request: user=FACEBOOK\username
Feb 1 14:50:59 server.facebook.com digest-service[36275]: digest-request kdc: ok user=F5KP60PFF9VN\username proto=ntlmv2 flags: NEG_KEYEX, ENC_128, NEG_VERSION, NEG_TARGET_INFO, NEG_NTLM2, NEG_ALWAYS_SIGN, NEG_NTLM, NEG_SIGN, NEG_TARGET, NEG_UNICODE

view raw

success.log

hosted with ❤ by GitHub

Failure:


Feb 1 14:52:18 server.facebook.com digest-service[36275]: digest-request: uid=0
Feb 1 14:52:18 server.facebook.com digest-service[36275]: digest-request netr: failed user=FACEBOOK\username DC status code c000006d
Feb 1 14:52:18 server.facebook.com digest-service[36275]: digest-request: netr failed with -1073741715 proto=ntlmv2
Feb 1 14:52:18 server.facebook.com digest-service[36275]: digest-request: od failed with 2 proto=ntlmv2
Feb 1 14:52:18 server.facebook.com digest-service[36275]: digest-request: user=FACEBOOK\username
Feb 1 14:52:18 server.facebook.com digest-service[36275]: digest-request: kdc failed with -1561745592 proto=ntlmv2
Feb 1 14:52:18 server.facebook.com digest-service[36275]: digest-request: guest failed with -1561745590 proto=ntlmv2

view raw

fail.log

hosted with ❤ by GitHub

This seems to be the key indicator of success:
kdc: ok user=F5KP60PFF9VN\username proto=ntlmv2
Compare that to the failure log:
kdc failed with -1561745592 proto=ntlmv2

Hmm, what the heck error code is that?

Googling got me to one specific hint, which is what gave the solution away:

Linux cifs mount with ntlmssp against an Mac OS X (Yosemite
10.10.5) share fails in case the clocks differ more than +/-2h:

The clock!

Well, That Was Obvious In Hindsight

I needed to verify the clock on one of the affected machines. Sure enough, the technician confirmed that the date was December 31, 1969. Definitely a bit more than 2 hours difference to the server.

In my defense, I’d like to remind you that I was troubleshooting this remotely and therefore couldn’t have noticed this without someone telling me and yes I’m rationalizing my failures stop looking at me like that I’m hideous don’t even look at me

The real question, then, is why this was happening. DeployStudio NBIs, when built via DeployStudio Assistant or Per Oloffson’s excellent AutoDSNBI, use an NTP server to sync up the date and time to prevent precisely this problem. What went wrong here?

The next silly thing: it turns out we changed our NTP server, and I simply failed to notice. The old NTP server didn’t resolve anymore, and that’s why any client that happened to have an expired clock battery (and therefore set back to the default time) failed to sync back up.

So the 60% fail rate we were seeing was essentially random luck against a pile of old machines, some of whom had been powered off for so long the clock battery ran out and the system time was reset.

Rebuilding the NBIs with the correct NTP server fixed the problem immediately.

The lesson from all of this?

Check the damn clock.

Adding JNLP files to Java Deployment Rulesets

Several Java updates back, Oracle introduced a feature to Java called Deployment Rulesets, which allowed enterprise deployment managers to whitelist specific sites to be able to run Java applets without providing warnings or errors to the end users.

There’s lots of good documentation about the general process, so I won’t cover it here. Check these out if this is new to you:

The Issue

I got a request from a user to add a certain site to the Deployment Ruleset, so I did the usual thing:

  <rule>
    <id location="*.domain.com" />
    <action permission="run" />
  </rule>

Except it didn’t work.

This site, rather than running the Java applet via the web, instead downloads a JNLP file. This JNLP file is essentially a bookmark that then downloads other .jar files into the Oracle cache, and then runs them locally, with the same Deployment rules.

The Deployment rules for JNLP are a bit harder and more stringent than normal Java web apps. The simple URL isn’t sufficient to make it work.

After scouring around for some details on this, I did find a helpful post in Oracle’s community detailing how to use the certificate hash to approve all jar files from that domain instead. That way, as long as the same cert was used (which is generally the case), users would have permission to launch jar files that were downloaded and signed with that cert.

So the next obvious question is: how do we find the cert? Luckily, Oracle documents that too:
Get the Certificate Hash

Problem is, I didn’t know what jar file it was talking about. I only had a .jnlp file to work with.

The Cache

Thanks to a hat tip from Michael Lynn on this, otherwise I’d have been flabbergasted. When the .jnlp file is loaded by Java Web Start, it downloads all the jar files it needs into the Oracle cache.

Thanks to Oracle’s documentation, that’s located here:
~/Library/Application Support/Oracle/Java/Deployment/cache

Unfortunately, the cache isn’t very helpful. Inside the cache was a directory named 6.0, and inside there was a bunch of directories numbered 1-50. Inside each of those directories were pairs of files, named with random numbers, one with no extension, one with an .idx extension.

The hat tip from Michael Lynn is that those files without extensions actually are the .jar files, just unlabelled. If you’re lucky, you may be able to sort them by modification or creation time, to see which ones you actually want to work with. If you’re unlucky, there’s a way to figure out more precisely what file to look for:

  1. Open this file in a text editor:
    /Library/Application\ Support/Oracle/Java/Deployment/deployment.properties
  2. Add/change the following settings:
deployment.trace.level=all
deployment.javapi.lifecycle.exception=true
deployment.trace=true
deployment.log=true
  1. Run the .jnlp file, which will proceed to download the .jar files it needs (or validate them inside the cache folder).
  2. When you encounter the Deployment Rule Set violation exception, look in the logs folder:
    ~/Library/Application\ Support/Oracle/Java/Deployment/log/
  3. The last modified log will contain a ton of data, but somewhere in there will be the security message indicating a violation. It will look something like this (despite being a .log file, it’s actually XML):
<record>
  <date>2016-01-14T20:42:44</date>
  <millis>1452832964163</millis>
  <sequence>1036</sequence>
  <logger>com.sun.deploy</logger>
  <level>FINE</level>
  <class>com.sun.deploy.trace.LoggerTraceListener</class>
  <method>print</method>
  <thread>11</thread>
  <message>security: JUT Record:
    javaws application denied [Java applets for this domain have been blocked. Contact Help Desk for questions.]
    http://domain.com/JavaClient/:  app_model=*a whole lot of garbage*
</message>
</record>

This message is the “final” failure message indicating that the URL (in this example, "http://domain.com/JavaClient/:") failed, and produced the message specified by your Ruleset.xml default response (in this example, “Java applets for this domain have been blocked…”).

From here, you need to scroll farther back in the records to see the exact file that triggered this reaction:

<record>
  <date>2016-01-14T20:42:43</date>
  <millis>1452832963045</millis>
  <sequence>1029</sequence>
  <logger>com.sun.deploy</logger>
  <level>FINE</level>
  <class>com.sun.deploy.trace.LoggerTraceListener</class>
  <method>print</method>
  <thread>11</thread>
  <message>security: Validating cached jar url=http://domain.com/JavaClient/pcclient.jar ffile=/Users/nmcspadden/Library/Application Support/Oracle/Java/Deployment/cache/6.0/58/586c64fa-40bd2f37 com.sun.deploy.cache.CachedJarFile@660395a5
</message>
</record>

Bingo!

Finally, we got the path of the exact file that, in our example above, is actually “pcclient.jar”, downloaded into the cache.

Once you’ve identified one of the cached jar files to work with, you can actually extract the certificate hash:
keytool -printcert -jarfile filename | more

This will get you output that looks like this:

keytool -printcert -jarfile ~/Library/Application\ Support/Oracle/Java/Deployment/cache/6.0/2/1b2c3982-2e369813
Signer #1:

Signature:

Owner: CN=..., O=..., L=..., ST=..., C=...
Issuer: CN=CA, OU=ou, O=Symantec Corporation, C=US
Serial number: <serial>
Valid from: Tue Feb 10 16:00:00 PST 2015 until: Wed Apr 11 16:59:59 PDT 2018
Certificate fingerprints:
MD5: <md5hash>
SHA1: <sha1hash>
SHA256: 89:14:B8:4A:F8:B3:2A:0D:3B:A1:49:28:D9:B1:6F:D6:CE:E4:2A:42:62:EB:C4:71:A1:E8:22:AE:84:8C:38:F1
Signature algorithm name: SHA256withRSA
Version: 3

That SHA256 hash is what you’re looking for, just without colons.

You can now add that hash directly to your Java ruleset with the certificate attribute:

  <rule>
    <id>
      <certificate hash="8914B84AF8B32A0D3BA14928D9B16FD6CEE42A4262EBC471A1E822AE848C38F1" />
    </id>
    <action permission="run" />
  </rule>  

Test your JNLP and see if that works!

Using iOSConsole to Query Information About iOS Devices

When Apple discontinued iPhone Configuration Utility, we lost the ability to access certain kinds of information easily from iOS devices that had not yet completed the Setup Assistant. With iPCU, we could attach a device to a computer and then get information such as WiFi MAC Address and Bluetooth MAC Address (which are not written on the box, nor on the outside of the device). Anyone who requires any kind of MAC-address authentication for wireless (like me) will need this information before being able to activate iOS devices on our network.

Unfortunately, Apple Configurator doesn’t give this kind of information for devices that have not yet been Prepared. Xcode’s Devices window also doesn’t provide this information for attached devices. iPCU was the only tool that provided this info right off the bat.

Thankfully, Sam Marshall has provided us with some tools to get this information, by building a framework called iOSConsole. This does require compiling this project in Xcode, so there are a few steps that must be done first.

Major, major credit to Mike Lynn for his instructions on how to build this project – I wouldn’t have been able to do this without his help.

Obtain the Project Files

Update: Sam Marshall has provided a pre-built version of iOSConsole that is already signed, so you can simply download the release and skip to the “Using iOSConsole” section below. Thanks, Sam!

  1. Go to https://github.com/samdmarshall/SDMMobileDevice and download the Master as a zip.
  2. Go to https://github.com/samdmarshall/Core-Lib/tree/62b93fa94fbfde421ea8bb1513f5e935191e755d, which is a specific commit in time, and download the Master as a zip.
  3. Extract both archives.
  4. Place Core-Lib-62b93fa94fbfde421ea8bb1513f5e935191e755d/Core into SDMMobileDevice-master/Core/. The end result should look like SDMMobileDevice-master/Core/Core/.

Alternatively, you can do it via git:
git clone https://github.com/samdmarshall/SDMMobileDevice.git
cd SDMMobileDevice;
git submodule update --init --recursive

Build the Project

  1. Open SDMMobileDevice.xcworkspace
  2. Click on the scheme (to the right of the grey Stop square button) that currently says “reveal_loader” and change it to “iOSConsole”:
    Screenshot 2015-07-08 13.49.47
    Screenshot 2015-07-08 13.49.41
  3. Click on “iOSConsole” in the left sidebar:
    Screenshot 2015-07-08 13.50.00
  4. Go to the Product menu -> Scheme -> Edit Scheme:
    Screenshot 2015-07-08 13.50.10Screenshot 2015-07-08 13.50.16
  5. Change Build Configuration to “Release” (it defaults to Debug):
    Screenshot 2015-07-08 13.50.18
    Screenshot 2015-07-08 13.50.20
  6. With “iOSConsole” highlighted in left sidebar, you should see Build Settings menu:
  7. Scroll down to Code Signing section and make sure “Don’t code sign” is selected:
    Screenshot 2015-07-08 13.50.42
  8. Go to the Product menu -> Build for -> Running:
    Screenshot 2015-07-08 13.50.56
    Screenshot 2015-07-08 13.50.59
  9. The build should succeed after compiling.
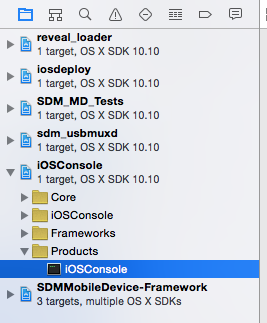
  10. Click the disclosure triangle underneath iOSConsole in left sidebar.
  11. Click the disclosure triangle underneath “Products” under “iOSConsole”:
    Screenshot 2015-07-08 13.51.41
  12. Right click “iOSConsole” under “Products” and choose “Show in Finder”:
    Screenshot 2015-07-08 13.51.44
  13. This will open up the “Release” folder:
    Screenshot 2015-07-08 13.51.47

Using iOSConsole

Navigate to this in Terminal (cd :drag folder into Terminal:):

./iOSConsole --help to see available commands:

-h [service|query] : list available services or queries
-l,--list : list attached devices
-d,--device [UDID] : specify a device
-s,--attach [service] : attach to [service]
-q,--query <domain>=<key> : query value for <key> in <domain>, specify 'null' for global domain
-a,--apps : display installed apps
-i,--info : display info of a device
-r,--run [bundle id] : run an application with specified [bundle id]
-p,--diag [sleep|reboot|shutdown] : perform diag power operations on a device
-x,--develop : setup device for development
-t,--install [.app path] : install specificed .app to a device
-c,--profile [.mobileconfig path] : install specificed .mobileconfig to a device

./iOSConsole -h query to see available information domains and keys to query

./iOSConsole --list (or ./iOSConsole -l) to list all attached iOS devices and get device identifiers for each device. You’ll need these device identifiers to specify which devices you want to query information from, using the -d argument.

./iOSConsole -l
Currently connected devices: (1)
1) d194149c6d840dcbabdd638d5aa5cee3e4eeb0c7 : iPad (iPad Air) (USB)

To get Ethernet Address (aka WiFi MAC address):
./iOSConsole -d d194149c6d840dcbabdd638d5aa5cee3e4eeb0c7 -q null=EthernetAddress
Bluetooth address:
./iOSConsole -d d194149c6d840dcbabdd638d5aa5cee3e4eeb0c7 -q null=BluetoothAddress

Note that most values are unavailable until after activation takes place.

If you want to get all possible information from the device (this is quite a lot):
./iOSConsole -d d194149c6d840dcbabdd638d5aa5cee3e4eeb0c7 -q NULL=NULL

This tool allows you to get some hardware information from devices without having to complete the setup process first.

Suppressing Adobe CC 2015 Splash Screens

Adobe has released new version of the CC apps, now called the “2015” versions. With the new Adobe CC apps comes new behavior.

Many of thew new CC 2015 apps have new splash screens. Some of them use a new welcome screen called “Hello” which is actually an interactive web page that requires network connection to function. This has resulted in some problems) for some users or bad network conditions.

Even if it works fine, it’s an extra step for users who just want to get started. In some cases, I’d prefer to suppress this welcome screen if possible. Here’s how you can do it for the new CC 2015 products:

Centrally managed

Photoshop, Illustrator, InDesign:

These apps are helpfully documented by Adobe. It involves downloading a file called “prevent_project_hello_launching.jsx” and placing it into the startup scripts folders for the Adobe software.

Here’s a script to build a package to do this, once you download the file and extract it from the .zip:


#!/bin/bash
temppath="$(mktemp -d -t AdobePSIDIL)"
/bin/mkdir -p "$temppath/Library/Application Support/Adobe/Startup Scripts CC/Adobe Photoshop/"
/bin/mkdir -p "$temppath/Library/Application Support/Adobe/Startup Scripts CC/Adobe InDesign/"
/bin/mkdir -p "$temppath/Library/Application Support/Adobe/Startup Scripts CC/Illustrator 2015/"
/bin/cp prevent_project_hello_launching.jsx "$temppath/Library/Application Support/Adobe/Startup Scripts CC/Adobe Photoshop/"
/bin/cp prevent_project_hello_launching.jsx "$temppath/Library/Application Support/Adobe/Startup Scripts CC/Adobe InDesign/"
/bin/cp prevent_project_hello_launching.jsx "$temppath/Library/Application Support/Adobe/Startup Scripts CC/Illustrator 2015/"
/usr/bin/pkgbuild –root "$temppath" –identifier "org.sacredsf.adobe.psidil.welcome" –version 1.0 AdobePSIDIL-Welcome.pkg

AfterEffects:

After Effects uses the same “Startup Scripts CC” folder as the ones above, but requires a slightly different script.
Place this content into /Library/Application Support/Adobe/Startup Scripts CC/Adobe After Effects/suppress_welcome.jsx:

app.preferences.savePrefAsBool("General Section", "Show Welcome Screen", false) ;

Alternatively, you can also just run this script to build a package to do this (you do not need to save the above file):


#!/bin/bash
temppath="$(mktemp -d -t AdobeAfterEffects)"
/bin/mkdir -p "$temppath/Library/Application Support/Adobe/Startup Scripts CC/Adobe After Effects"
echo "app.preferences.savePrefAsBool(\"General Section\", \"Show Welcome Screen\", false) ;" > "$temppath/Library/Application Support/Adobe/Startup Scripts CC/Adobe After Effects/after_effects.jsx"
/usr/bin/pkgbuild –root "$temppath" –identifier "org.sacredsf.adobe.aftereffects.welcome" –version 1.0 AdobeAfterEffects-Welcome.pkg

Lightroom 6

Lightroom 6, thankfully, uses the built in preference system. All the settings are stored in ~/Library/Preferences/com.adobe.Lightroom6.plist, and can be changed using defaults.

Lightroom launches a barrage of messages, notices, and prompts at the user when it first launches, but they all correspond to preference keys that can be changed or managed. Here are the preference keys:

firstLaunchHasRun30 = 1
noAutomaticallyCheckUpdates = 1
noSplashScreenOnStartup = 1
"com.adobe.ag.library_Showed_Walkthroughs" = 1
"Showed_Sync_Walkthrough" = 1
HighBeamParticipationNoticeHasShowed = 1

Here’s a profile that will configure those settings as well.

Per-user Preferences

Dreamweaver

Unfortunately, Dreamweaver doesn’t seem to have any nice mechanism for centrally managing the preferences via startup scripts or anything. The only way I’ve discovered to manage this is by copying in a pre-fabbed “Adobe Dreamweaver CC 2015 Prefs” file into the preferences folder, which is located at:
~/Library/Preferences/Adobe Dreamweaver CC 2015 Prefs.

To apply this setting to all users, we need to deploy it to a central location (such as /Library/Preferences/Adobe/Adobe Dreamweaver CC 2015 Prefs, which is simply the non-user-specific equivalent of the preferences path), and then copy it into each user’s Library at login. We can use Outset to accomplish this easily.

These are the settings you need to provide in the Prefs file that will turn off the hello page on startup (including first run). Save this file as “Adobe Dreamweaver CC 2015 Prefs”:

[GENERAL PREFERENCES]
show hello page=FALSE

This script will be run by Outset to copy the preferences file from a centralized Library location into the user account’s correct Preferences location:


#!/bin/sh
/bin/cp -f "/Library/Preferences/Adobe Dreamweaver CC 2015 Prefs" "$HOME/Library/Preferences/Adobe Dreamweaver CC 2015 Prefs"

Download and save this script as “AdobeDWCCPrefs.sh”. The ending destination for this script is going to be /usr/local/outset/login-once/, which will trigger the first time a user logs in.

This script will build the package that will deposit all the necessary files in the right places, once you’ve downloaded and saved the two files above (the script, and Prefs file):


#!/bin/bash
temppath="$(mktemp -d -t AdobeDreamweaver)"
/bin/mkdir -p "$temppath/Library/Preferences/"
/bin/cp "Adobe Dreamweaver CC 2015 Prefs" "$temppath/Library/Preferences/Adobe Dreamweaver CC 2015 Prefs"
/bin/mkdir -p "$temppath/usr/local/outset/login-once"
/bin/chmod ugo+x AdobeDWCCPrefs.sh
/bin/cp AdobeDWCCPrefs.sh "$temppath/usr/local/outset/login-once/"
/bin/mkdir "scripts"
/bin/cp AdobeDWCCPrefs.sh "scripts/postinstall"
/usr/bin/pkgbuild –root "$temppath" –identifier "org.sacredsf.adobe.dreamweaver.welcome" –scripts "scripts" –version 1.0 AdobeDreamweaver-Welcome.pkg

Muse:

Muse has the same problem as Dreamweaver. You will need to drop a pre-configured “helloPrefStore.xml” into the Muse preferences folder, which is located at:
~/Library/Preferences/Adobe/Adobe Muse CC/2015.0/helloPrefStore.xml

As with Dreamweaver, we’ll deploy this file into a central location (such as /Library/Preferences/Adobe/Adobe Muse CC/2015.0/helloPrefStore.xml), and then copy it into each user’s Library at login with Outset.

Save this file as helloPrefStore.xml in a local directory:

<prop.list>
<prop.pair>
<key>helloPrefVersion</key>
<ustring>2015.0</ustring>
</prop.pair>
<prop.pair>
<key>helloUIDontShowAgain</key>
<false/>
</prop.pair>
</prop.list>

This script will be run by Outset to copy the preferences file from a centralized Library location into the user account’s correct Preferences location:


#!/bin/sh
/bin/cp -f "/Library/Preferences/Adobe/Adobe Muse CC/2015.0/helloPrefStore.xml" "$HOME/Library/Preferences/Adobe/Adobe Muse CC/2015.0/helloPrefStore.xml"

Download and save this script as “AdobeMuseCCHelloPrefStore.sh”. The ending destination for this script is going to be /usr/local/outset/login-once/, which will trigger the first time a user logs in.

This script will build the package that will deposit all the necessary files in the right places, once you’ve downloaded and saved the two files above (the script, and XML file):


#!/bin/bash
temppath="$(mktemp -d -t AdobeMuse)"
/bin/mkdir -p "$temppath/Library/Preferences/Adobe/Adobe Muse CC/2015.0/"
/bin/cp helloPrefStore.xml "$temppath/Library/Preferences/Adobe/Adobe Muse CC/2015.0/"
/bin/mkdir -p "$temppath/usr/local/outset/login-once"
/bin/chmod ugo+x AdobeMuseCCHelloPrefStore.sh
/bin/cp AdobeMuseCCHelloPrefStore.sh "$temppath/usr/local/outset/login-once/"
/bin/mkdir "scripts"
/bin/cp AdobeMuseCCHelloPrefStore.sh "scripts/postinstall"
/usr/bin/pkgbuild –root "$temppath" –identifier "org.sacredsf.adobe.muse.welcome" –scripts "scripts" –version 1.0 AdobeMuse-Welcome.pkg

Required welcome screens

Edge Animate

Unlike some of the other CC applications, Edge Animate CC 2015’s welcome screen is required to load the rest of the app content. The welcome screen serves as the entrypoint into creating or loading up a project (similar to iMovie or GarageBand’s introductory windows). The welcome screen will appear regardless of whether or not you have a project available or previously opened, and closing the welcome screen will quit the application.

Flash CC

Flash CC uses the welcome screen as part of its window templates, so it can’t be suppressed.

Prelude

Similar to Edge Animate, the welcome screen is a required way to access projects. However, by default, it will show this window every startup regardless of whether or not you are loading a project already.

You can uncheck that box by default by pre-providing a stripped down copy of Adobe Prelude’s preferences file, located at ~/Library/Application Support/Adobe/Prelude/4.0/Adobe Prelude Prefs:


<?xml version="1.0" encoding="UTF-8"?>
<PremiereData Version="3">
<Preferences ObjectRef="1"/>
<Preferences ObjectID="1" ClassID="f06902ec-e637-4744-a586-c26202143e36" Version="30">
<Properties Version="1">
<MZ.Prefs.ShowQuickstartDialog>false</MZ.Prefs.ShowQuickstartDialog>
</Properties>
</Preferences>
</PremiereData>

You can use the same mechanism as described above in Muse to do so. Save the above gist as “Adobe Prelude Prefs”.

Save this Outset script as “AdobePreludeCCPrefs.sh”:


#!/bin/sh
/bin/cp -f "/Library/Application Support/Adobe/Prelude/4.0/Adobe Prelude Prefs" "$HOME/Library/Application Support/Adobe/Prelude/4.0/Adobe Prelude Prefs"

Use this script to build a package for it:


#!/bin/bash
temppath="$(mktemp -d -t AdobePreludePro)"
/bin/mkdir -p "$temppath/Library/Application Support/Adobe/Prelude/4.0/"
/bin/cp Adobe\ Prelude\ Prefs "$temppath/Library/Application Support/Adobe/Prelude/4.0/Adobe Prelude Prefs"
/bin/mkdir -p "$temppath/usr/local/outset/login-once"
/bin/chmod ugo+x AdobePreludeCCPrefs.sh
/bin/cp AdobePreludeCCPrefs.sh "$temppath/usr/local/outset/login-once/"
/bin/mkdir "scripts"
/bin/cp AdobePreludeCCPrefs.sh "scripts/postinstall"
/usr/bin/pkgbuild –root "$temppath" –identifier "org.sacredsf.adobe.prelude.welcome" –scripts "scripts" –version 1.0 AdobePrelude-Welcome.pkg

Just remember that you cannot completely suppress the Prelude welcome screen, but you can prevent it from coming up by default in the future.

Premiere Pro

Premiere Pro displays a similar “Hello” welcome screen that Photoshop, InDesign, and Illustrator do. With Premiere Pro, like Adobe Prelude, the splash screen will always display on startup if no default project has been selected / created. Otherwise, it will open the last project. It does not seem possible to isolate a specific key to disable the welcome screen – if anyone finds one, please let me know in the comments!

Premiere Pro’s preferences are stored in ~/Documents/Adobe/Premiere Pro/9.0/Profile-/Adobe Premiere Pro Prefs.

Although I’m not sure what happens if you make changes here, it also lists a “SystemPrefPath” as /Library/Application Support/Adobe/Adobe Premiere Pro Cc 2015. You may be able to centralize preferences there.

CC applications with no welcome screens:

  • Audition
  • Character Animator (Preview)
  • InCopy
  • Media Encoder
  • SpeedGrade

We Are Imagr (And So Can You)

For a long time, Mac Admins have been relying on the wonderfully useful tool DeployStudio. This free tool has been the mainstay of many deployment strategies, and has been my old faithful for years.

Despite its utility and functionality, it has some issues. Some of its functionality is almost black-box opaque, and we have to make some guesses and assumptions, and do some wrestling to make it work the way we want. The biggest issue, of course, is that it’s OS X-only, meaning that Mac deployment relies on having a Mac in a data-center environment. This makes many network administrators unhappy, as Apple does not offer an enterprise-level Mac anymore, not since the 2009 XServe was discontinued. Putting Mac Minis in the data center has raised eyebrows among the server purists and network neckbeards, but no one could deny how useful DeployStudio is. But since it’s not open-source, there’s not much the Mac admin community can really do about it.

Finally, that’s about to change – thanks to Graham Gilbert and his incredible work on his tool called Imagr. Imagr is an open-source deployment tool that runs in a NetInstall environment and makes running scripts, restoring images, and installing packages easy.

Imagr now leverages the functionality of Pepijn Bruienne’s AutoNBI to make the creation of all-inclusive NetBoot Images (hereafter referred to as “NBIs”) easy and straightforward.

Imagr is in its early stages of development, so there’s obviously lots of rough edges and work to be done. Improvements are being made constantly, and by many contributors, so you can get an idea of the excitement of the community around an open-source tool to do deployments with.

Despite Graham’s excellent work at the wiki, getting a chance to play with it may be a bit foreboding to admins who aren’t sure where to start.

First, I’d suggest reading Greg Neagle’s excellent starting point blog posts: Part 1 and Part 2.

I’d like to get into a bit more detail so that future admins who want to test can investigate this thoroughly.

The Setup

You need four things to test out Imagr:

  1. A NetBoot server.
    The easiest way to accomplish this is with an OS X Server running the NetBoot service. If you have an existing DeployStudio server running on OS X Server, that would be a perfect choice. See Greg Neagle’s post above for how you can use Imagr with existing DeployStudio NBIs. I’ll be referring to this as the “Netboot server.”
  2. A target device or VM to test with.
    I highly recommend using VMWare Fusion’s NetBoot compatibility to make testing faster, but if you’ve got a physical machine you’re willing to blow away, that works just fine too. I’ll be referring to this as the “client.”
  3. A web server.
    OS X Server running a Web service will work just fine. I’m using my existing Munki repo. I’ll refer to this as the “web server.” If you want to use OS X Server 4’s default web server, just place all relevant files in /Library/Server/Web/Data/Sites/Default/.
  4. A machine to generate your NBIs on, preferably running 10.10.3 build 14D136 (to be compatible with all current Apple hardware).
    This could also be the OS X Server if you’re using one, as long as it’s fully updated to the latest version of OS X. I’ll be referring to this as the “admin computer.”

In this post, I’m going to use my existing 10.9.5 OS X Server 3 to serve out NetBoot (since it’s already used for DeployStudio). I’m using my own workstation as the admin computer, running 10.10.3 build 14D136 to generate the NBIs. I’m testing with a VMWare Fusion 7 Pro VM as client that will be NetBooting.

Preparing Your NBI:

Note: pre-step zero: download the latest Yosemite installer from the Mac App Store. I’ll be using the default path: /Applications/Install OS X Yosemite.app in this example.

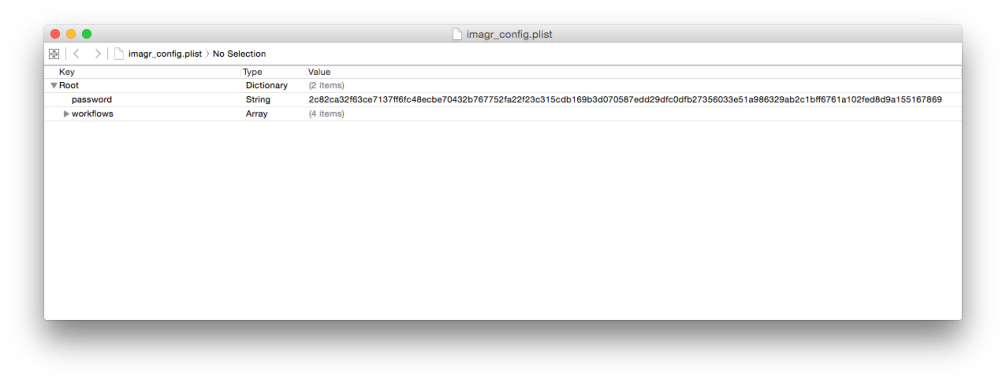
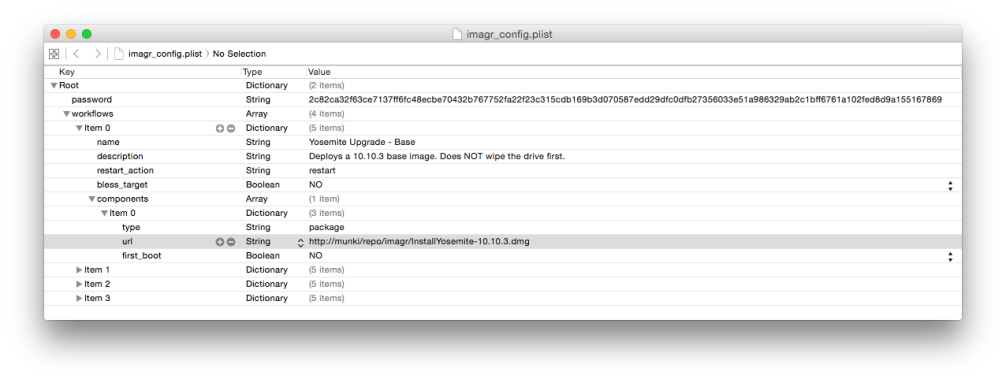
  1. Create a file called imagr_config.plist that is hosted on your Web server.
    I’m hosting it on my munki repo in a folder called ‘imagr’, so it can accessed at http://munki/repo/imagr/imagr_config.plist. We’ll fill the contents of this file shortly. For now, just make sure it’s accessible.
  2. On the admin computer, download or clone Imagr from the GitHub page:
    git clone https://github.com/grahamgilbert/imagr.
  3. Create a file called config.mk in the same directory as the “Makefile” that is included with the Imagr clone (~/Applications/imagr/config.mk would be the path in my example).
  4. This config.mk file is going to be used to override the variables. Change the URL, which should be the accessible URL of your “imagr_config.plist” file. Additionally, if you have existing NBIs (from DeployStudio, for example), make sure you choose an index that does not collide with an existing one. The default is 5000:
    URL="http://munki/repo/imagr/imagr_config.plist"
    APP="/Applications/Install OS X Yosemite.app"
    OUTPUT=~/Desktop/
    NBI="Imagr-Testing"
    ARGS="-e -p" # Enable Netboot set, include python
    INDEX=5000
    

  5. From inside the imagr directory, run this command:
    make nbi

  6. At the end of the lengthy command run, you should have a file located in your OUTPUT folder (in this example, on the Desktop) called “Imagr-Testing.nbi”.
  7. This NBI needs to be copied to your NetBoot server. If you’re using OS X Server as your NetBoot server, you need to place this file in /Library/NetBoot/NetBootSP0/.
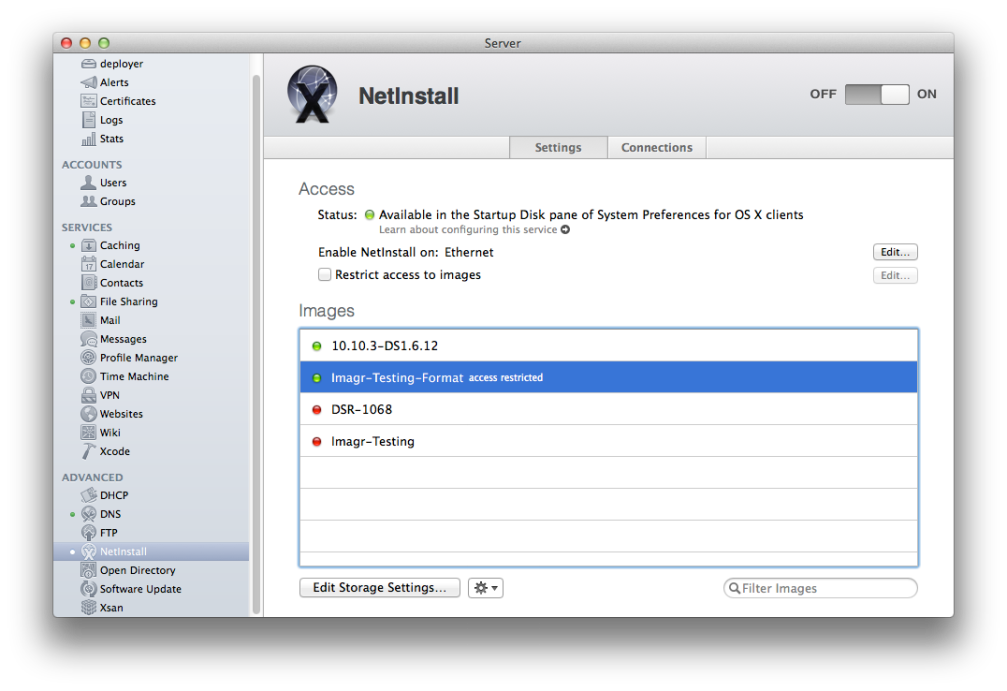
  8. Launch Server.app and go the NetInstall section. You should see it show up:
    Screen Shot 2015-05-12 at 8.55.00 AM
  9. Select your “Imagr-Testing” boot image and click on the gear icon to get its properties and details:
    Screen Shot 2015-05-12 at 8.55.12 AM
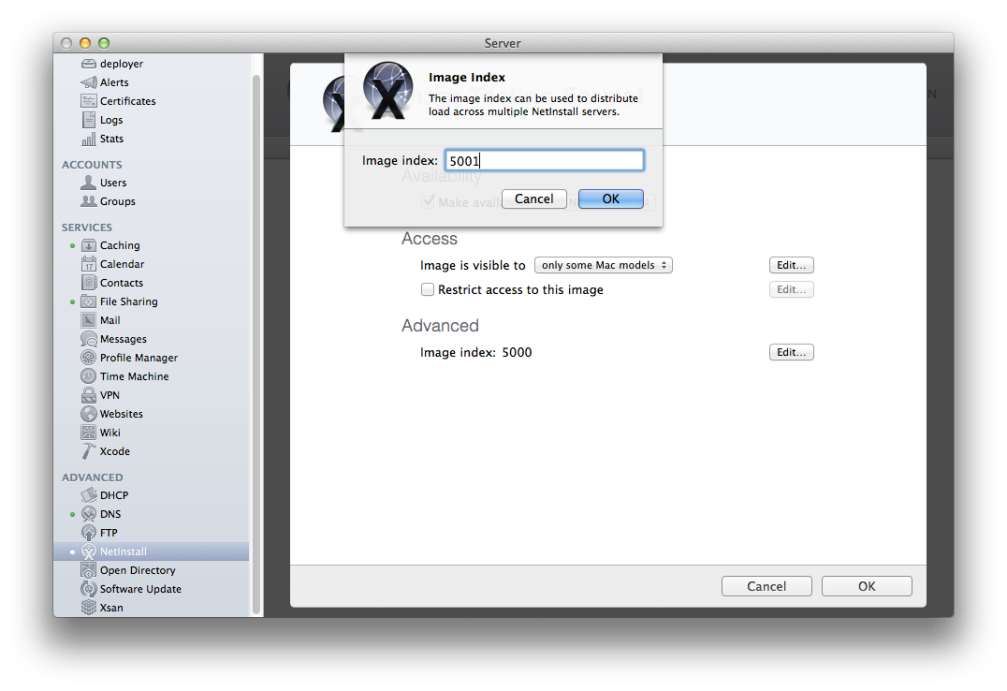
  10. First, make sure that the index it chooses (by default, 5000) does not collide with other NBI indexes. If it does, change the index number here (and then change your config.mk to build NBIs using a different index).
    Screen Shot 2015-05-12 at 8.54.48 AM
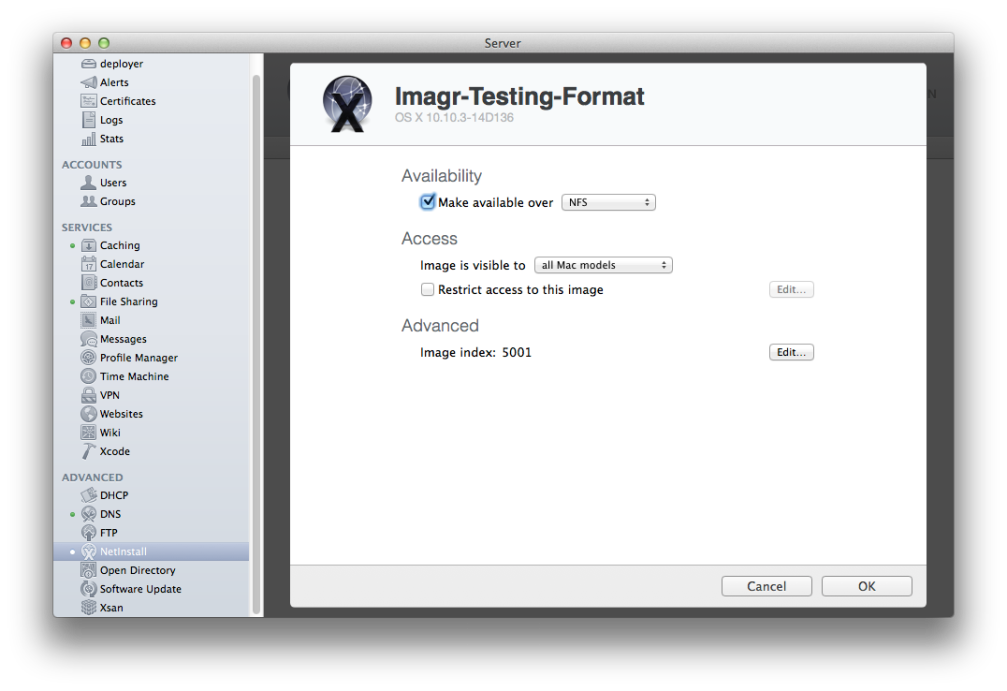
  11. By default, the NBI only makes itself available to compatible Mac models. This is great for actual deployment, but if you want to do testing with a VM, you might need to turn this off. Change the availability so that it’s open for “all Mac models”:
    Screen Shot 2015-05-12 at 8.55.12 AM
  12. If you’re doing testing with a VMWare Fusion VM, you’ll also need to make sure that the “Imagr-Testing” NBI is the Default netboot image, as Fusion only works with the default. Select the image, click the gear icon, choose “Use as Default Boot Image.”
    Screen Shot 2015-05-12 at 8.55.19 AM
  13. Verify on your clients. You should be able to see the “Imagr-Testing” netboot image in the Startup Disk pane of the System Preferences.

Creating a Workflow:

Now that the NBI is ready, we need an actual Imagr deployment configuration so that it can be tested. This workflow information is stored in the imagr-config.plist file we created on the Web server earlier. The workflow structure is documented on the wiki.

You can use any text editor to create this plist. For visual completeness, I’ll also include screenshots of Xcode’s visual plist editor.

Here’s the starting empty plist:


<?xml version="1.0" encoding="UTF-8"?>
<!DOCTYPE plist PUBLIC "-//Apple//DTD PLIST 1.0//EN" "http://www.apple.com/DTDs/PropertyList-1.0.dtd"&gt;
<plist version="1.0">
<dict>
<key>password</key>
<string></string>
<key>workflows</key>
<array>
</array>
</dict>

First, we need a password. On any computer with Python (such as the Admin computer):
python -c 'import hashlib; print hashlib.sha512("YOURPASSWORDHERE").hexdigest()'
Copy the long hash string and set that as the value of the Password key at the root of the plist:


<key>password</key>
<string>278c0c9360772fc0ab2f25c7bcafdd2579e3aa05ba4041abbf30d0ebe4c9b8b1b56f4b1ba822ccf32072e3ac443b14b49d99fa1201b02011fd486078d83b3cde</string>

Screenshot 2015-05-12 09.09.44

Now it’s time to fill out a workflow. This basic workflow is going to install a live package (i.e. not at first boot). This package is a CreateOSXInstallPkg package for 10.10.3 build 14D136. It needs to be accessible via HTTP somewhere, so it’s a prime candidate for going into the “imagr” directory on the Web server I already created.

The package installation can be described like this:


<dict>
<key>name</key>
<string>Yosemite Upgrade – Base</string>
<key>description</key>
<string>Deploys a 10.10.3 base image. Does NOT wipe the drive first.</string>
<key>restart_action</key>
<string>restart</string>
<key>bless_target</key>
<false/>
<key>components</key>
<array>
<dict>
<key>type</key>
<string>package</string>
<key>url</key>
<string>http://munki/repo/imagr/InstallYosemite-10.10.3.dmg</string&gt;
<key>first_boot</key>
<false/>
</dict>
</array>
</dict>

Screenshot 2015-05-12 09.24.06

In this workflow, we’re specifying a restart_action value of restart, which forces Imagr to reboot when the workflow completes (successfully).

The components key lists the actual process for things we want to do. Here, we’re just using a component of type package, which installs a package. We specify the url to the package, and we’re installing this package live, not at first boot, thanks to the value of false for first_boot.

Note that the url key points to a disk image, not a package itself. CreateOSXInstallPkg produces a bundle package, not a flat package, and thus it must be wrapped in a disk image. If you aren’t sure how to do that, follow these steps:

  1. mkdir InstallYosemite-10.10.3
  2. mv InstallYosemite-10.10.3.pkg InstallYosemite-10.10.3/
  3. /usr/bin/hdiutil create -srcfolder InstallYosemite-10.10.3 InstallYosemite-10.10.3.dmg
  4. Copy the resulting disk image to the location where it can be served via Web.

All this workflow accomplishes is installing the CreateOSXInstallPkg package, and then restarts.

Read the documentation to see how you can also leverage Scripts and Image cloning in addition to package installs. The workflow is fairly extensible.

Testing Out Imagr:

We have a NBI image we created, serving out NetBoot from the NetBoot server. We have a workflow in our imagr_config.plist file to install a package. Now it’s time for an actual test.

  1. Boot up a VM or physical device (the client device) to the NetBoot image called “Imagr-Testing” (or whatever you named it).
  2. Log in using the password you specified (in my example, it was “YOURPASSWORDHERE”).
  3. Run your workflow!

Testing it out again, and then again

If you want to make any changes to your NBI (or are testing out new forks/updates to Imagr), you need to rebuild the NBI each time.

  1. make update to rebuild the NBI without needing to build from scratch. This will save time (hat tip to Erik Gomez and Clayton Burlison).
  2. Copy it to your NetBoot server into /Library/NetBoot/NetBootSP0.
  3. Change index number if necessary (which you should do by specifying a unique index number in config.mk.
  4. Change the models to “All Mac models” if booting into a VM.
  5. Set the boot image as default.
  6. Reboot the client machine.
  7. Rinse, wash, repeat!

Fixing Adobe CCP’s Broken Uninstallers

I wrote previously about Adobe Creative Cloud products and Munki.

It’s an ongoing struggle.

This week, I discovered a rather unfriendly issue with the process. If you use Serial Number Licensing (i.e. serialized per-device installs) in Creative Cloud Packager (CCP), you get an Installer.pkg and Uninstaller.pkg that contains all the CC products you checked the boxes for. In most cases, with some exceptions, the Uninstaller packages do the right thing with Munki and uninstall the product.
Screen Shot 2015-04-23 at 9.48.40 AM

However, because these packages are all serialized, if you uninstall any serialized package, it removes the serialization from the device completely. This will break any existing CC apps still remaining on the machine.

More specific example:

  1. Create a Serial Number CCP package for Photoshop CC.
  2. Create a Serial Number CCP package for Dreamweaver CC.
  3. Install them both on the same machine / VM.
  4. Launch both Photoshop CC and Dreamweaver CC.
  5. Use the CCP Uninstaller package for Dreamweaver CC on that machine.
  6. Try to launch Photoshop.

Instead of Photoshop launching as you’d expect, you’re instead greeted by the Adobe Application Manager asking you to sign in and serialize your product – because there are no longer any serialization data on the device.

Uninstalling any CCP-generated product like this will completely remove all serialization.

I spoke to Adobe about this, and this was the response:
Screenshot 2015-04-22 12.20.43

Not great news – this is “semi-expected” behavior, and is potentially a huge problem.

Who Does This Affect?

Anyone who generates CCP packages for individual CC products using Serial Number Licensing can be affected by this. Admins already using Named Licensing will not encounter this issue.

The Solution

Patrick Fergus brought to my attention a clever idea. Since CCP allows the creation of both serialized (Serial Number Licensing) and non-serialized (Named Licensing) packages, we might already have a solution in place. The non-serialized packages don’t uninstall the serialization – because they never install it in the first place.

Thus, it’s possible to combine a serialized installer with a non-serialized uninstaller.

Here’s the general workflow:

  1. Create a Serial Number-licensed CCP package for Photoshop CC.
  2. Create a Serial Number-licensed CCP package for Dreamweaver CC.
  3. Install them both on the same machine / VM.
  4. Launch both Photoshop CC and Dreamweaver CC.
  5. Create a Name-licensed (non-serialized) CCP package for Dreamweaver CC.
  6. Use the Name-licensed (non-serialized) Uninstaller package for Dreamweaver CC to uninstall Dreamweaver on that machine.
  7. Try to launch Photoshop.
  8. It works! Photoshop launches as expected.

Using This Solution With Munki

Incorporating this into Munki is a bit more work.

If you’re starting fresh and haven’t already imported the Adobe CC products yet, you’re in luck, because this is relatively simple. Otherwise, we have to fix the pkginfos for each of the products in the repo.

Haven’t Yet Imported Adobe CC Products Into Munki:

The first step is to read the Munki wiki page about Adobe CC products.

Before you run Tim Sutton’s munkiimport script for CC installers, there’s some setup to be done.

You’ll need to run CCP twice for each package – once to create the Serial Number-licensed installer, and once to create the Name-license installer.

Copy/overwrite the Uninstaller packages from the Name-license versions into the Build folders for each Serial Number-licensed CCP package you created. The end goal here is that each product should be using the Serial Number Installer package and Named Uninstaller package.

Now go ahead and run Tim Sutton’s munkiimport script, and it will do the right thing.

Test thoroughly!

Fixing existing Adobe CC products in a Munki repo:

If you’ve already used Tim Sutton’s munkiimport script for CC installers to import your existing CC packages, it’s now time to fix the broken uninstallers.

You’ll need to run the CCP packages again for each product you want to fix – this time using Named licensing instead of Serial Number licensing, to create non-serialized packages. You can safely delete the Installer.pkg files to save space, as you don’t need them – you only need to keep the ~4mb Uninstaller.pkg files.

Next, you need to wrap each of the Uninstaller.pkg files in a DMG to replace the existing uninstaller DMGs in your Munki repo. You can do this using the same method munkiimport does:
hdiutil create -srcFolder /path/to/Named/Build /path/to/nonserialized/uninstaller.dmg

If I’m creating an uninstaller DMG for Adobe After Effects CC, for example:
hdiutil create -srcFolder Adobe/CC_Packages-NoSerial/AfterEffectsCCNoSerial/Build AfterEffectsCC_Uninstall-13.0.0.dmg
It’s important to make sure that the name of the DMG you are creating is identical to the one you are replacing.

The pkginfo files also need to be fixed for each product. Since the uninstaller items are being replaced, the hash sums for these DMGs must also be replaced with the new one – or Munki will complain that the hashes don’t much and won’t uninstall.

To calculate the SHA256 sum of the DMG, use this command:
shasum -a 256 /path/to/uninstaller.dmg
Then copy the resulting hash (the long string of letters and numbers) into the value of the uninstaller_item_hash key for each pkginfo you are replacing the uninstaller DMG for.

Copy the uninstaller DMGs to the Munki repo in exactly the same place as the previous ones, overwriting the previous DMGs.

Finally, run makecatalogs.

Test thoroughly!

Obvious Downsides

There’s one major issue here – uninstalling an Adobe CC product that was installed with serialization in this manner will not remove the serialization for that product on the device. In other words, if you are trying to count the number of licenses for Photoshop you have, uninstalling Photoshop CC via the Named-license uninstaller will not give you your license back (in the eyes of Adobe).

More than that, even if you uninstall all Adobe CC products from a machine using these non-serialized uninstallers, it won’t actually remove the serialization at the end. According to Adobe licensing, the device will still be using up a seat at the table.

With an ETLA agreement, where we have unlimited licenses and pay annual cost based on the number of Full-Time Employees, this isn’t an issue in our environment. But for anyone who has limited licenses of any of the products, this is an issue that has to be accounted for and worked around.

Possible solutions

If the goal is to remove all serialization from a machine after removing all Adobe CC products, you can use CCP to create a “License File package” – which isn’t actually a package, but a collection of files that includes a binary to serialize, and one to remove all serialization. This “RemoveVolumeSerial” binary (which is not an editable script!) could be run on the machines to remove all serialization.

If you need to remove a specific product license but leave the others untouched, you may have to look into the Adobe Provisioning Toolkit to accomplish what you need.

Signing .mobileconfig Profiles With Keychain Certificates

Generating .mobileconfig profiles should be a straightforward process for the Mac admin. There are many tools to do so – Profile Manager, Apple Configurator (although it lacks the OS-X specific keys), just about every MDM, mcxToProfile, etc.

In most cases, the profiles generated this way are unsigned – meaning that there’s no verification that the profile that gets installed on a client node was the one you wrote. Generally speaking, this isn’t really an issue if you trust your deployment system. I’ve yet to see a case where anyone tried to “exploit” a profile maliciously, but if nothing else, it could be irritating to have someone hijack a profile. It’s a good security practice to ensure that your clients only get installed what you expect, and signing a profile prevents tampering.

Signing a profile is surprisingly easy, thanks to Greg Neagle who pointed me in the right direction.

First, you need to decide what certificate you want to sign your profiles with. This can be any certificate, really, but the value of signing your profile is to use a certificate that your clients automatically trust. You can either use your own institution’s trusted CA (if you have one), or you can use a certificate trusted by a root CA already in the system – such as anything by RapidSSL, StartSSL, VeriSign, etc. It must be a certificate for which you have the private key.

You can also use Apple Developer certificates, if you subscribe to the Apple developer programs (and you should, as a Mac or iOS admin – $99 goes a really, really long way).

In this example, I’m going to use my Apple Developer cert. Sign into the dev center first, and then click on “Certificates”:

Screenshot 2015-04-21 15.32.46

If you don’t already have a certificate, you can add one:
Screenshot 2015-04-21 15.32.59

Once you’ve got the certificate added and downloaded, make sure you import it and the private key into your Keychain. In this example, I’m going to use my organization’s “Developer ID Installer” certificate to sign my certificates.

How do I know which certificates I can use?

Not every certificate in your Keychain will be valid for signing. You can only sign with valid identities. To figure out which of your identities will work for signing things, you can use the security command:

/usr/bin/security find-identity -p codesigning -v

The -p codesigning argument tells it to only display identities that match the codesigning policy.

The -v argument tells security to only display valid identities. (Without this option, you could see revoked or expired identities).

Take note of the name of the certificates that this command outputs – you’ll use one of them in the next section.

Signing an individual profile:

Use the security command to sign the profile using your identity:

/usr/bin/security cms -S -N "Mac Developer Application" -i /path/to/your.mobileconfig -o /path/to/your/signed/output.mobileconfig

As the manpage suggests, the -S argument tells security cms to sign something.

The -N argument, in this case “Mac Developer Application”, tells it to sign something using a certificate that matches the name. Note: it will fail if it can’t figure out which certificate you mean. If there’s any ambiguity (i.e. more than one possible certificate that matches the string you provided), it will fail and complain. Try and be as explicit as possible, and make sure you only use a valid identity found from the previous section.

The -i argument provides an input .mobileconfig file to be signed.

The -o argument provides an output signed .mobileconfig file to be created.

NOTE: When you run this command, you’ll get a security prompt. The security command will request that access to use the keychain, each time it runs (unless you click “Always Allow”). You can control this in the Keychain Access.app by going to “Get Info” on the private key of the certificate and choosing “Access control,” and making changes there.

Signing multiple profiles:

You can use a simple bash script:


#!/bin/bash
for profile in Profiles/*.mobileconfig
do
s=${profile##*/}
outName=${s%.*}
outName+="Signed.mobileconfig"
/usr/bin/security cms -S -N "Mac Developer Application" -i $profile -o "$outName"
done

view raw

SignProfiles.sh

hosted with ❤ by GitHub

In a directory called “Profiles” that is, unsurprisingly, full of .mobileconfig files, go through each one, run the security cms command on it, and create a file with “Signed” in the name.

The s and outName variables are just fun, unreadable ways of using Bash string manipulations to insert “Signed” into the filename.

The end result is that you’ll now have a folder full of ProfileNameSigned.mobileconfig files, signed with the certificate you specified using -N.

NOTE: When you run this script, you’ll get a security prompt. The security command will request that access to use the keychain, each time it runs (unless you click “Always Allow”). You can control this in the Keychain Access.app by going to “Get Info” on the private key of the certificate and choosing “Access control,” and making changes there.

Testing the profile out:

Before deploying, try testing this profile out on a VM. When I install one of these signed VMs, this is what I see in the Profiles pane:
2

If you click on the “Verified” in green, you’ll see the certificate:
Screen Shot 2015-04-22 at 7.27.12 AM

When your profile is signed and trusted, you can rest easy knowing that nobody can mess with it anywhere in transit without breaking the code signing.