Some Context
The following section is primarily a “state of the world” discussion of current Adobe licensing and deployment methods. If you’d rather skip the wall of text and go straight to the technical details, click here.
Among the many common tasks of a Munki admin, dealing with Adobe will be one that consistently generates sighs, groans, and binge drinking. Veteran Munki admins are no stranger to the constant supply of hilarity provided by deploying Adobe packages, and it’s a common topic of discussion. As of writing time, there are 697 results for “Adobe” on Munki-Dev.
The Munki wiki itself has pages devoted to handling Adobe products all the way back to CS3. I wrote a significant chunk of the current wiki page on handling Adobe CC, and that was back when the 2015 versions were the first CC products to deal with.
Now, of course, it’s all changed again as Adobe has introduced new “hyperdrive” style packages from Creative Cloud Packager (CCP), which required yet more work from the Munki developers to accommodate. While the actual installer package might be slightly more sane and operate slightly faster, the overall process for generating and deploying them hasn’t changed much.
As you might infer from all of this, packaging, preparing, and deploying Adobe software has been an ongoing struggle, with no signs of lightening up.
Licensing Is My Favorite Thing, Just Like Sausage Made Of Balsa Wood
For the release of the Adobe CC products, Adobe also introduced a new licensing style – “named” as opposed to the previous “serialized.” CCP allowed you to generate packages that would install the products in either Named or Serialized format, but they required completely different work on the backend.
“Serialized” Adobe products are what most admins are used to, and most admins are likely deploying, due to the Byzantine nature of Adobe licensing for enterprises.
From a technical point of view, though, “Serialized” is a simple concept – you install the product itself, and then you install the license as well. The license on the computer is an opaque black box that Adobe manages that determines what software is or isn’t allowed to run, or maybe will expire in 32,767 days. When you install new products, you reapply the license. Simple in concept.
Oh, except for the part where uninstalling a single serialized product would remove the license for all serialized products.
What’s In A Name?
“Named” licenses are also simple in concept, and actually more simple in execution as well. A “named” license product is only available to a user via an Adobe ID, through the Creative Cloud Desktop App (CCDA). This requires a fundamentally different licensing agreement with Adobe than “serialized” licenses, which is why most Munki admins and Apple techs in general don’t have much control over it – we aren’t usually the ones who sign the Dump Trucks Full Of Money™ agreements with vendors. Someone in Upper Management™ usually makes those decisions, and often without any input from the people who have to do the bulk of the work.
If you’re lucky enough to have an ETLA style agreement with Adobe, or Creative Cloud For Teams, you can probably use “named” licenses. The fun part is that you can have license agreements for both “named” and “serialized”, either together, or separate, that may expire or require renewal at different times.
The good news, though, is that “named” licensing doesn’t really require that much extra work. There’s no license package that needs to be installed on the client, and Adobe’s CCDA basically does all the work for determining what software users are allowed to use. From a technical standpoint, this is much easier for both users and IT operators, because there’s just less surface area for things to go wrong.

With “named” licensing and the CCDA, there aren’t real “releases” anymore. Rather than releasing yearly (or more) product cycles like the old “Creative Suite” 1-6, product changes are released in smaller increments more regularly, and the CCDA keeps things up to date without the admins having to necessarily rebuild packages every time.
Although there’s no official word on this, my suspicion (and this is entirely my personal opinion) is that “serialized” licensing will eventually disappear. We’re already seeing products released only on CCDA via named licensing (Adobe Experience Manager), which to me sounds like a death knell for the old “build serial packages and send them off” system.
So if you read the writing on the wall that way, the future for building serialized packages via CCP seems grim (as if the present use of CCP wasn’t already dystopian enough). I’m frustrated enough with CCP, Adobe packages, and “Adobe setup error 79” that I’m actually looking forward to a named-license only environment.
But of course, we don’t want to lose the functionality we get with Munki. Allowing users to decide what software they get and allowing them to pick things on-demand is one of the most useful features of Munki itself!
Now that I’ve spent 800 words covering the context, let’s talk about implementation.
Craft Your Casus Belli, Claim Your Rightful Domain
The ultimate goal of this process is to set up named licensing, get our users loaded or synced up into it, and provide access to the software entitlements we’ve paid for.
There’s lots of ways to go about this, but as is Facebook custom, we like solving problems by over-engineering the living daylights out of them. So my methodology is to try and set up all the pieces I need for self service by utilizing Adobe’s User Management API. We want this process to be as user-driven as possible, mostly so that I don’t have to do all the work.
The Org-Specific Technical Stuff
If you aren’t already familiar with it, the Adobe Enterprise Dashboard is the central location for managing Adobe named licenses. In order to maximize our integration, we want to use Federated IDs, where accounts are linked to our Active Directory (AD) infra. There’s various pros and cons to this, but if you’ve already got an AD + SAML setup, this is a good use case for it.
Step one in this phase of the process is Claiming Your Domain, where we claim ownership over the domain matching the email addresses we expect our users to authenticate with. This does require submitting a claim to Adobe, and they verify it and provide a TXT record that must be served by your outward-facing DNS (so Adobe can verify that you own the domain you say you do).
Once your domain is claimed and set up, we wanted to utilize our Single Sign On (SSO) capability. Adobe uses Okta to connect to an SAML 2.0-compatible SSO environment, so you and the team that manages your identity settings will need to do some work with Adobe to make that work.
The details of this process are documented in the links above, and is generally specific to your organization, so there’s no need to go into details here.
Learning To Fly (with the API)
Despite me covering it in three paragraphs, the above section took me the most amount of work – mostly because so much that was out of my control. Once you get past the difficult setup phase, the implementation of the User Management API becomes relatively painless – if you’re familiar with Python.
The good news is that the API is very thoroughly documented.
In order to utilize the API, you need a few pieces:
- A certificate registered in the API
- The private key for the cert for the API to auth with
- The domain variables provided by the API certificate tool
- Three custom Python modules –
pyjwt,requests,cryptography - Python (2 or 3) – system Python is fine
Certified Genius
First, you’ll need to set up a new Integration in the Adobe I/O portal.
If you don’t have a certificate and its private key already available, you can generate a self-signed one:
$ openssl req -x509 -sha256 -nodes -days 365 -newkey rsa:2048 -keyout private.key -out certificate_pub.crt
You can then upload this cert into the Adobe I/O portal.
Adobe doesn’t actually verify the cert for anything except confirmation that the private key and public key match, so there’s no technical reason in terms of the API why you can’t keep using it. It’s always a good practice to use a real certificate, but for initial testing, this works just fine.
Upload the cert to your Integration, and it’ll provide you with the values you’ll need for crafting your config file below.
Once you’ve got a cert and the private key, you can start writing the API script.
SNAAAAAAKE, OH IT’S A SNAAAKE
Adobe’s sample scripts are quite thorough, and they use Python, which works perfectly for Mac admins. The downside, though, is that you’ll need to install three custom modules on any client who is going to use this script to access your API.
There’s a couple of ways to handle this, so it’s up to you to decide which one you want to pursue.
You can do it via pip:
sudo /usr/bin/python -m ensurepip
sudo /usr/bin/python -m pip install --ignore-installed --upgrade requests
sudo /usr/bin/python -m pip install --ignore-installed --upgrade pyjwt
sudo /usr/bin/python -m pip install --ignore-installed --upgrade cryptography
You can download the source for each of those modules and build it manually, and then copy the built modules into a central location on the client where you can load them:
cd PyJWT-1.4.2
python setup.py build
Whatever method you prefer to use, you need to be able to run the Python interpreter and import each of those modules (specifically jwt and requests) successfully to use the API sample scripts.
The Config File
Next up is the crafting of your config file:
[server]
host = usermanagement.adobe.io
endpoint = /v2/usermanagement
ims_host = ims-na1.adobelogin.com
ims_endpoint_jwt = /ims/exchange/jwt

[enterprise]
domain = my domain
org_id = my organization id
api_key = my api key/client id
client_secret = my api client secret
tech_acct = my api client technical account
priv_key_filename = my private key filename from above
The values for the [enterprise] section are all provided by the Integration when you upload the cert you created.
For example, for Facebook, it might look something like this:
[enterprise]
domain = facebook
org_id = ABC123@AdobeOrg
api_key = abc123
client_secret = abc-123-456
tech_acct = abc123@techacct.adobe.com
priv_key_filename = private.key
The priv_key_filename must simply be the name (not the path!) of the file that contains your private key that you generated earlier.
Start Your Script
Most of the start of this script is ripped straight from the samples page:
This file contains bidirectional Unicode text that may be interpreted or compiled differently than what appears below. To review, open the file in an editor that reveals hidden Unicode characters.
Learn more about bidirectional Unicode characters
| #!/usr/bin/python | |
| """Adobe API tools.""" | |
| import sys | |
| import time | |
| import json | |
| import os | |
| try: | |
| import jwt | |
| import requests | |
| except ImportError: | |
| sys.exit(0) | |
| if sys.version_info[0] == 2: | |
| from ConfigParser import RawConfigParser | |
| from urllib import urlencode | |
| from urllib import quote | |
| if sys.version_info[0] >= 3: | |
| from configparser import RawConfigParser | |
| from urllib.parse import urlencode | |
The good news is that this (theoretically) works in both Python 2 or 3 (NOTE: I have not tested this in Python 3).
The initial part of the script just gets us the setup we need to make calls later. We’ll use jwt to create the JSON Web Token (which itself uses cryptography to use the “RS256” hashing algorithm to sign the token with the private key), and requests to make it easy to send GET and POST requests to the API endpoint.
You could write your own GET/POST tools, or use urllib2 or any pure Python method of accomplishing the same thing; requests isn’t technically a requirement. It just dramatically simplifies the process, and Adobe’s sample code uses it, so I decided to stick with their solution for now.
The Config Data
Before we can use the API, we’ll need to set up all the required variables and create the access token, the JSON web token, and the config data read from the file we created earlier. The Adobe sample documentation does this directly in a script, but I wanted to make it a bit more modular (i.e. I use functions). It’s a little bit cleaner this way.
First, let’s parse the private key and user config:
This file contains bidirectional Unicode text that may be interpreted or compiled differently than what appears below. To review, open the file in an editor that reveals hidden Unicode characters.
Learn more about bidirectional Unicode characters
| def get_private_key(priv_key_filename): | |
| """Retrieve private key from file.""" | |
| priv_key_file = open(priv_key_filename) | |
| priv_key = priv_key_file.read() | |
| priv_key_file.close() | |
| return priv_key | |
| def get_user_config(filename=None): | |
| """Retrieve config data from file.""" | |
| # read configuration file | |
| config = RawConfigParser() | |
| config.read(filename) | |
| config_dict = { | |
| # server parameters | |
| 'host': config.get("server", "host"), | |
| 'endpoint': config.get("server", "endpoint"), | |
| 'ims_host': config.get("server", "ims_host"), | |
| 'ims_endpoint_jwt': config.get("server", "ims_endpoint_jwt"), | |
| # enterprise parameters used to construct JWT | |
| 'domain': config.get("enterprise", "domain"), | |
| 'org_id': config.get("enterprise", "org_id"), | |
| 'api_key': config.get("enterprise", "api_key"), | |
| 'client_secret': config.get("enterprise", "client_secret"), | |
| 'tech_acct': config.get("enterprise", "tech_acct"), | |
| 'priv_key_filename': config.get("enterprise", "priv_key_filename"), | |
| } | |
| return config_dict |
Next, we’ll need to craft the JSON web token, which needs to be fed the config data we read from the file earlier, and signed with the private key:
This file contains bidirectional Unicode text that may be interpreted or compiled differently than what appears below. To review, open the file in an editor that reveals hidden Unicode characters.
Learn more about bidirectional Unicode characters
| def prepare_jwt_token(config_data, priv_key): | |
| """Construct the JSON Web Token for auth.""" | |
| # set expiry time for JSON Web Token | |
| expiry_time = int(time.time()) + 60 * 60 * 24 | |
| # create payload | |
| payload = { | |
| "exp": expiry_time, | |
| "iss": config_data['org_id'], | |
| "sub": config_data['tech_acct'], | |
| "aud": "https://" + config_data['ims_host'] + "/c/" + | |
| config_data['api_key'], | |
| "https://" + config_data['ims_host'] + "/s/" + "ent_user_sdk": True | |
| } | |
| # create JSON Web Token | |
| jwt_token = jwt.encode(payload, priv_key, algorithm='RS256') | |
| # decode bytes into string | |
| jwt_token = jwt_token.decode("utf-8") | |
| return jwt_token |
Yes, thank you, I realize “jwt_token” is redundant now that I look at it, but I’m not changing my code, dangit.
With the JWT available, we can craft the access token. This is where requests really comes in handy:
This file contains bidirectional Unicode text that may be interpreted or compiled differently than what appears below. To review, open the file in an editor that reveals hidden Unicode characters.
Learn more about bidirectional Unicode characters
| def prepare_access_token(config_data, jwt_token): | |
| """Generate the access token.""" | |
| # Method parameters | |
| url = "https://" + config_data['ims_host'] + config_data['ims_endpoint_jwt'] | |
| headers = { | |
| "Content-Type": "application/x-www-form-urlencoded", | |
| "Cache-Control": "no-cache" | |
| } | |
| body_credentials = { | |
| "client_id": config_data['api_key'], | |
| "client_secret": config_data['client_secret'], | |
| "jwt_token": jwt_token | |
| } | |
| body = urlencode(body_credentials) | |
| # send http request | |
| res = requests.post(url, headers=headers, data=body) | |
| # evaluate response | |
| if res.status_code == 200: | |
| # extract token | |
| access_token = json.loads(res.text)["access_token"] | |
| return access_token | |
| else: | |
| # print response | |
| print(res.status_code) | |
| print(res.headers) | |
| print(res.text) | |
| return None |
With all of these functions ready, it’s really easy to combine them together in a single convenient generate_config() function, which can be used by other public functions to handle all the messy work. The purpose of this function is to load up the config data and private key from a specific location on disk (rather than having to continually paste all of this into the Python interpreter).
This file contains bidirectional Unicode text that may be interpreted or compiled differently than what appears below. To review, open the file in an editor that reveals hidden Unicode characters.
Learn more about bidirectional Unicode characters
| def generate_config(userconfig=None, private_key_filename=None): | |
| """Return tuple of necessary config data.""" | |
| # Get userconfig data | |
| if userconfig: | |
| user_config_path = userconfig | |
| else: | |
| # user_config_path = raw_input('Path to config file: ') | |
| user_config_path = '/opt/facebook/adobeapi_usermanagement.config' | |
| if not os.path.isfile(str(user_config_path)): | |
| print('Management config not found!') | |
| sys.exit(1) | |
| # Get private key | |
| if private_key_filename: | |
| priv_key_path = private_key_filename | |
| else: | |
| # priv_key_path = raw_input('Path to private key: ') | |
| priv_key_path = '/opt/facebook/adobeapi_private.key' | |
| if not os.path.isfile(str(priv_key_path)): | |
| print('Private key not found!') | |
| sys.exit(1) | |
| priv_key = get_private_key(priv_key_path) | |
| # Get config data | |
| config_data = get_user_config(user_config_path) | |
| # Get the JWT | |
| jwt_token = prepare_jwt_token(config_data, priv_key) | |
| # Get the access token | |
| access_token = prepare_access_token(config_data, jwt_token) | |
| if not access_token: | |
| print("Access token failed!") | |
| sys.exit(1) | |
| return (config_data, jwt_token, access_token) | |
Here, we’ve simply stored the private key and config file in /opt/facebook for easy retrieval. Feel free to replace this path with anything you like. The idea is that these two files – the private key and the config file – will be present on all the client systems that will be making these API calls.
Our config functions are all set up and good to go, so now it’s time to write the functions to actually interact with the Adobe API itself.
Let’s Ask the API For Some Data
All of the Adobe API queries use common headers in their requests. To save ourselves some time, and avoiding having to retype the same thing repeatedly, let’s use a convenient function to return the headers we need:
This file contains bidirectional Unicode text that may be interpreted or compiled differently than what appears below. To review, open the file in an editor that reveals hidden Unicode characters.
Learn more about bidirectional Unicode characters
| def headers(config_data, access_token): | |
| """Return the headers needed.""" | |
| headers = { | |
| "Content-type": "application/json", | |
| "Accept": "application/json", | |
| "x-api-key": config_data['api_key'], | |
| "Authorization": "Bearer " + access_token | |
| } | |
| return headers |
Now we have all the config pieces we need, let’s ask for some important pieces of data from the API – the product configuration list, the user list, and data about a specific user.
This file contains bidirectional Unicode text that may be interpreted or compiled differently than what appears below. To review, open the file in an editor that reveals hidden Unicode characters.
Learn more about bidirectional Unicode characters
| def _product_list(config_data, access_token): | |
| """Get the list of product configurations.""" | |
| page = 0 | |
| result = {} | |
| productlist = [] | |
| while result.get('lastPage', False) is not True: | |
| url = "https://" + config_data['host'] + config_data['endpoint'] + \ | |
| "/groups/" + config_data['org_id'] + "/" + str(page) | |
| res = requests.get(url, headers=headers(config_data, access_token)) | |
| if res.status_code == 200: | |
| # print(res.status_code) | |
| # print(res.headers) | |
| # print(res.text) | |
| result = json.loads(res.text) | |
| productlist += result.get('groups', []) | |
| page += 1 | |
| return productlist | |
| def _user_list(config_data, access_token): | |
| """Get a list of all users.""" | |
| page = 0 | |
| result = {} | |
| userlist = [] | |
| while result.get('lastPage', False) is not True: | |
| url = "https://" + config_data['host'] + config_data['endpoint'] + \ | |
| "/users/" + config_data['org_id'] + "/" + str(page) | |
| res = requests.get(url, headers=headers(config_data, access_token)) | |
| if res.status_code == 200: | |
| # print(res.status_code) | |
| # print(res.headers) | |
| # print(res.text) | |
| result = json.loads(res.text) | |
| userlist += result.get('users', []) | |
| page += 1 | |
| return userlist | |
| def _user_data(config_data, access_token, username): | |
| """Get the data for a given user.""" | |
| userlist = _user_list(config_data, access_token) | |
| for user in userlist: | |
| if user['email'] == username: | |
| return user | |
| return {} |
In order to control how much data is sent back from these queries (which can result in rather large sets of data), Adobe automatically paginates each request. These two functions both start at page 0 and continue to loop until the resulting request contains lastPage = True. Just keep in mind each individual request will only give you a subset of the data.
With a list of product configurations, a list of all users, and the ability to ask for data on any specific user, we actually have nearly all of the data we’ll ever need. Rather than combining these pieces ourselves, we can also query some more specifics.
Here’s how to get a list of all users who currently have a specific product configuration entitlement:
This file contains bidirectional Unicode text that may be interpreted or compiled differently than what appears below. To review, open the file in an editor that reveals hidden Unicode characters.
Learn more about bidirectional Unicode characters
| def _users_of_product(config_data, product_config_name, access_token): | |
| """Get a list of users of a specific configuration.""" | |
| page = 0 | |
| result = {} | |
| userlist = [] | |
| while result.get('lastPage', False) is not True: | |
| url = "https://" + config_data['host'] + config_data['endpoint'] + \ | |
| "/users/" + config_data['org_id'] + "/" + str(page) + "/" + \ | |
| quote(product_config_name) | |
| res = requests.get(url, headers=headers(config_data, access_token)) | |
| if res.status_code == 200: | |
| # print(res.status_code) | |
| # print(res.headers) | |
| # print(res.text) | |
| result = json.loads(res.text) | |
| userlist += result.get('users', []) | |
| page += 1 | |
| return userlist |
With that data, it’s also easy to get a list of all products a given user has:
This file contains bidirectional Unicode text that may be interpreted or compiled differently than what appears below. To review, open the file in an editor that reveals hidden Unicode characters.
Learn more about bidirectional Unicode characters
| def _products_per_user(config_data, access_token, username): | |
| """Return a list of products assigned to user.""" | |
| user_info = _user_data(config_data, access_token, username) | |
| return user_info.get('groups', []) |
Enough Asking, It’s Time For Some Action!
With the above code, we’ve got the ability to ask for just about all the available data that we might care about. Now it’s time to start making some requests to the API that will allow us to make changes.
Hello, Goodbye, Mr. User
The obvious first choice here is the ability to create and remove a user. When I say “create a user”, I really mean “add a federated ID to our domain.” This is different than creating an Adobe ID (and see the links far above to see Adobe’s explanation of the difference between account types). Adobe does provide documentation for creating both types of accounts.
This file contains bidirectional Unicode text that may be interpreted or compiled differently than what appears below. To review, open the file in an editor that reveals hidden Unicode characters.
Learn more about bidirectional Unicode characters
| def _add_federated_user( | |
| config_data, access_token, email, country, firstname, lastname | |
| ): | |
| """Add user to domain.""" | |
| add_dict = { | |
| 'user': email, | |
| 'do': [ | |
| { | |
| 'createFederatedID': { | |
| 'email': email, | |
| 'country': country, | |
| 'firstname': firstname, | |
| 'lastname': lastname, | |
| } | |
| } | |
| ] | |
| } | |
| body = json.dumps([add_dict]) | |
| url = "https://" + config_data['host'] + config_data['endpoint'] + \ | |
| "/action/" + config_data['org_id'] | |
| res = requests.post( | |
| url, | |
| headers=headers(config_data, access_token), | |
| data=body | |
| ) | |
| if res.status_code != 200: | |
| print(res.status_code) | |
| print(res.headers) | |
| print(res.text) | |
| else: | |
| results = json.loads(res.text) | |
| if results.get('notCompleted') == 1: | |
| print("Not completed!") | |
| print(results.get('errors')) | |
| return False | |
| if results.get('completed') == 1: | |
| print("Completed!") | |
| return True | |
| def _remove_user_from_org(config_data, access_token, user): | |
| """Remove user from organization.""" | |
| add_dict = { | |
| 'user': user, | |
| 'do': [ | |
| { | |
| 'removeFromOrg': {} | |
| } | |
| ] | |
| } | |
| body = json.dumps([add_dict]) | |
| url = "https://" + config_data['host'] + config_data['endpoint'] + \ | |
| "/action/" + config_data['org_id'] | |
| res = requests.post( | |
| url, | |
| headers=headers(config_data, access_token), | |
| data=body | |
| ) | |
| if res.status_code != 200: | |
| print(res.status_code) | |
| print(res.headers) | |
| print(res.text) | |
| else: | |
| results = json.loads(res.text) | |
| if results.get('notCompleted') == 1: | |
| print("Not completed!") | |
| print(results.get('errors')) | |
| return False | |
| if results.get('completed') == 1: | |
| print("Completed!") | |
| return True |
You Get An Entitlement, YOU Get An Entitlement!
The next obvious choice is adding and removing product configurations to and from users:
This file contains bidirectional Unicode text that may be interpreted or compiled differently than what appears below. To review, open the file in an editor that reveals hidden Unicode characters.
Learn more about bidirectional Unicode characters
| def _add_product_to_user(config_data, products, user, access_token): | |
| """Add product config to user.""" | |
| add_dict = { | |
| 'user': user, | |
| 'do': [ | |
| { | |
| 'add': { | |
| 'product': products | |
| } | |
| } | |
| ] | |
| } | |
| body = json.dumps([add_dict]) | |
| url = "https://" + config_data['host'] + config_data['endpoint'] + \ | |
| "/action/" + config_data['org_id'] | |
| res = requests.post( | |
| url, | |
| headers=headers(config_data, access_token), | |
| data=body | |
| ) | |
| if res.status_code != 200: | |
| print(res.status_code) | |
| print(res.headers) | |
| print(res.text) | |
| else: | |
| results = json.loads(res.text) | |
| if results.get('notCompleted') == 1: | |
| print("Not completed!") | |
| print(results.get('errors')) | |
| return False | |
| if results.get('completed') == 1: | |
| print("Completed!") | |
| return True | |
| def _remove_product_from_user(config_data, products, user, access_token): | |
| """Remove products from user.""" | |
| add_dict = { | |
| 'user': user, | |
| 'do': [ | |
| { | |
| 'remove': { | |
| 'product': products | |
| } | |
| } | |
| ] | |
| } | |
| body = json.dumps([add_dict]) | |
| url = "https://" + config_data['host'] + config_data['endpoint'] + \ | |
| "/action/" + config_data['org_id'] | |
| res = requests.post( | |
| url, | |
| headers=headers(config_data, access_token), | |
| data=body | |
| ) | |
| if res.status_code != 200: | |
| print(res.status_code) | |
| print(res.headers) | |
| print(res.text) | |
| else: | |
| results = json.loads(res.text) | |
| if results.get('notCompleted') == 1: | |
| print("Not completed!") | |
| print(results.get('errors')) | |
| return False | |
| if results.get('completed') == 1: | |
| print("Completed!") | |
| return True | |
If you’ve been looking carefully, you’ll note that all of these functions start with _, indicating that they’re intended to be private module functions. Although Python doesn’t really enforce this, the reason is because I wrote this module to have internal data functions, and external/public convenience functions.
The public functions are all meant to be completely independent. The necessary work of generating the config data (the access token, JWT, etc.) should be abstracted away from the public use of these tools, and therefore we need internal functions to do all this work for us, and external public functions that others can call without needing to understand what they do.
We’ve covered all the private module functions, so now let’s get into the convenient public functions.
I’m Doing It For The Publicity
The public functions here should represent common queries that someone might want to use this module for.
Let’s start by providing a convenient list of Adobe product configurations:
This file contains bidirectional Unicode text that may be interpreted or compiled differently than what appears below. To review, open the file in an editor that reveals hidden Unicode characters.
Learn more about bidirectional Unicode characters
| def get_product_list(): | |
| """Get list of products.""" | |
| (config_data, jwt_token, access_token) = generate_config() | |
| productlist = _product_list(config_data, access_token) | |
| products = [] | |
| for product in productlist: | |
| products.append(product['groupName']) | |
| return products |
Take a look at this function, because you’ll see this same general strategy in all the rest of the public functions. We generate the config on the first line – by reading from the files on disk, and crafting the pieces we need on-demand. The config tuple is then used to feed the internal functions (in this case, _product_list() ). The end result is we get a nice Python list of all the product configurations, without any other unnecessary data.
We can do the same thing with users:
This file contains bidirectional Unicode text that may be interpreted or compiled differently than what appears below. To review, open the file in an editor that reveals hidden Unicode characters.
Learn more about bidirectional Unicode characters
| def get_user_list(): | |
| """Get list of user emails.""" | |
| (config_data, jwt_token, access_token) = generate_config() | |
| userlist = _user_list(config_data, access_token) | |
| names = [] | |
| for user in userlist: | |
| names.append(user['email']) | |
| return names |
Note that these two functions are essentially identical.
Straightforward request: does a user exist in our domain? Does this user already have a federated ID?
This file contains bidirectional Unicode text that may be interpreted or compiled differently than what appears below. To review, open the file in an editor that reveals hidden Unicode characters.
Learn more about bidirectional Unicode characters
| def user_exists(user): | |
| """Does the user exist already as a federated ID?""" | |
| (config_data, jwt_token, access_token) = generate_config() | |
| result = _user_data( | |
| config_data, | |
| access_token, | |
| user, | |
| ) | |
| if result.get('type') == 'federatedID': | |
| return True | |
| return False |
Note that the above function can be slightly misleading. It only returns True if the user’s type is “federated ID”. This doesn’t technically answer the question of “does this user exist at all”, but specifically answers “does this federated ID exist”?
Another useful query: does the user have a specific product entitlement?
This file contains bidirectional Unicode text that may be interpreted or compiled differently than what appears below. To review, open the file in an editor that reveals hidden Unicode characters.
Learn more about bidirectional Unicode characters
| def does_user_have_product(target_user, product): | |
| """Return True/False if a user has the specified product.""" | |
| (config_data, jwt_token, access_token) = generate_config() | |
| membership = _products_per_user(config_data, access_token, target_user) | |
| return product in membership |
While we’re on the topic of user management, here are public functions for adding and removing users:
This file contains bidirectional Unicode text that may be interpreted or compiled differently than what appears below. To review, open the file in an editor that reveals hidden Unicode characters.
Learn more about bidirectional Unicode characters
| def add_user(email, firstname, lastname, country='US'): | |
| """Add federated user account.""" | |
| (config_data, jwt_token, access_token) = generate_config() | |
| result = _add_federated_user( | |
| config_data, | |
| access_token, | |
| email, | |
| country, | |
| firstname, | |
| lastname, | |
| ) | |
| return result | |
| def remove_user(email): | |
| """Remove user account.""" | |
| (config_data, jwt_token, access_token) = generate_config() | |
| result = _remove_user_from_org( | |
| config_data, | |
| access_token, | |
| email, | |
| ) | |
| return result |
Finally, we get the last pieces we want – public functions to add and remove product entitlements to users:
This file contains bidirectional Unicode text that may be interpreted or compiled differently than what appears below. To review, open the file in an editor that reveals hidden Unicode characters.
Learn more about bidirectional Unicode characters
| def add_products(desired_products, target_user): | |
| """Add products to specific user.""" | |
| (config_data, jwt_token, access_token) = generate_config() | |
| productlist = _product_list(config_data, access_token) | |
| userlist = _user_list(config_data, access_token) | |
| names = [] | |
| for user in userlist: | |
| names.append(user['email']) | |
| products = [] | |
| for product in productlist: | |
| products.append(product['groupName']) | |
| if target_user not in names: | |
| print("Didn't find %s in userlist" % target_user) | |
| return False | |
| for product in desired_products: | |
| if product not in products: | |
| print("Didn't find %s in product list" % product) | |
| return False | |
| result = _add_product_to_user( | |
| config_data, | |
| desired_products, | |
| target_user, | |
| access_token, | |
| ) | |
| return result | |
| def remove_products(removed_products, target_user): | |
| """Remove products from specific user.""" | |
| (config_data, jwt_token, access_token) = generate_config() | |
| productlist = _product_list(config_data, access_token) | |
| userlist = _user_list(config_data, access_token) | |
| names = [] | |
| for user in userlist: | |
| names.append(user['email']) | |
| products = [] | |
| for product in productlist: | |
| products.append(product['groupName']) | |
| if target_user not in names: | |
| print("Didn't find %s in userlist" % target_user) | |
| return False | |
| for product in removed_products: | |
| if product not in products: | |
| print("Didn't find %s in product list" % product) | |
| return False | |
| result = _remove_product_from_user( | |
| config_data, | |
| removed_products, | |
| target_user, | |
| access_token, | |
| ) | |
| return result |
This module, all together, creates the adobe_tools Python module.
So… What Do I Do With This?
We have a good start here, but this is just the code to interact with the API. The ultimate goal is a user-driven self-service interaction with the API so that users can add themselves and get whatever products they want.
In order for Munki to make use of this, this module, along with the usermanagement.config and private.key files above, needs to be installed on your clients. There are a few different ways to make that happen, but shipping custom Python modules is outside the scope of this post. Suffice to say, let’s assume that you get to the point where opening up the Python interpreter and typing import adobe_tools works.
We’re going to use Munki to make that happen, but we’ll need a little bit more code first.
Adding A User And Their Product On-Demand
Before we get into the Munki portion, let’s solve the first problem: easily adding a product to a user. We have all the building blocks in the module above, but now we need to put it together into a cohesive script.
This is the “add_adobe.py” script:
This file contains bidirectional Unicode text that may be interpreted or compiled differently than what appears below. To review, open the file in an editor that reveals hidden Unicode characters.
Learn more about bidirectional Unicode characters
| #!/usr/bin/python | |
| """Add Adobe products to user on-demand.""" | |
| import sys | |
| # If you need to make sure this is always in your path, use: | |
| # sys.path.append('/path/to/your/lib') | |
| # Example: | |
| # sys.path.append('/opt/facebook/lib') | |
| import adobe_tools | |
| target_product = sys.argv[1] | |
| def getconsoleuser(): | |
| """Get the current console user.""" | |
| from SystemConfiguration import SCDynamicStoreCopyConsoleUser | |
| cfuser = SCDynamicStoreCopyConsoleUser(None, None, None) | |
| return cfuser[0] | |
| me = getconsoleuser() | |
| email = "%s@domain.com" % me | |
| # I'm cheating a bit here, just go with it | |
| firstname = me | |
| lastname = me | |
| country = 'US' | |
| def log(message): | |
| """Log with tag.""" | |
| print ( | |
| 'CPE-add_adobe', | |
| str(message) | |
| ) | |
| # Do I exist as a user? | |
| if not adobe_tools.user_exists(email): | |
| log("Creating account for %s" % email) | |
| # Add the user | |
| success = adobe_tools.add_user(email, firstname, lastname, country) | |
| if not success: | |
| log("Failed to create account for %s" % email) | |
| sys.exit(1) | |
| # Does the user already have the product? | |
| log("Checking to see if %s already has %s" % (email, target_product)) | |
| already_have = adobe_tools.does_user_have_product(email, target_product) | |
| if already_have: | |
| log("User %s already has product %s" % (email, target_product)) | |
| sys.exit(0) | |
| # Add desired product | |
| log("Adding %s entitlement to %s" % (target_product, email)) | |
| result = adobe_tools.add_products([target_product], email) | |
| if not result: | |
| log("Failed to add product %s to %s" % (target_product, email)) | |
| sys.exit(1) | |
| log("Done.") |
You run this script and pass it a product configuration. It detects the current logged in user, and if that user doesn’t already have a federated ID, it creates one. Then it checks to see if the user already has that product entitlement, and if not, it adds that product to the user.
There’s a bit of handwaving done there, and some assumptions made – especially in regards to the logged in user and the email account. If you already have an existing mechanism for obtaining this data (such as code for doing LDAP queries, or some other endpoint/database you can query for this info), you can easily add that in.
This script needs to go somewhere accessible on your clients, so put it anywhere you think makes sense – /usr/local/bin, or /usr/local/libexec, or /opt/yourcompany/bin or anything like that. That’s up to you.
Feeding the Munki
At this point, we’ve got four items on the clients that we need:
/opt/facebook/lib/adobe_tools.py/opt/facebook/bin/add_adobe.py/opt/facebook/usermanagement.config/opt/facebook/private.key
We’ve made the simple assumption that /opt/facebook/lib is in the Python PATH (as shown in the gist above, we can use a simple sys.path.append() to ensure that).
The only part left is providing the actual Munki items for users to interact with via Managed Software Center.app.
Although it isn’t covered in depth on the wiki, we can use Munki “nopkg” type items to simply run scripts without installing any packages. We’re going to combine this with using OnDemand style items so that users can click the “Install” button to get results done, but there’s no persistent state being checked. This essentially means we run the script every time the user clicks the button, which is why it’s important to be idempotent.
With everything on the client, our pkginfo is quite simple:
This file contains bidirectional Unicode text that may be interpreted or compiled differently than what appears below. To review, open the file in an editor that reveals hidden Unicode characters.
Learn more about bidirectional Unicode characters
| <?xml version="1.0" encoding="UTF-8"?> | |
| <!DOCTYPE plist PUBLIC "-//Apple//DTD PLIST 1.0//EN" "http://www.apple.com/DTDs/PropertyList-1.0.dtd"> | |
| <plist version="1.0"> | |
| <dict> | |
| <key>OnDemand</key> | |
| <true/> | |
| <key>autoremove</key> | |
| <false/> | |
| <key>catalogs</key> | |
| <array> | |
| <string>testing</string> | |
| </array> | |
| <key>category</key> | |
| <string>Adobe</string> | |
| <key>display_name</key> | |
| <string>Add Adobe Photoshop CC To My Panel</string> | |
| <key>icon_name</key> | |
| <string>AdobePhotoshopCC2015.png</string> | |
| <key>installer_type</key> | |
| <string>nopkg</string> | |
| <key>minimum_os_version</key> | |
| <string>10.11.0</string> | |
| <key>name</key> | |
| <string>AdobeCCAPI_Photoshop</string> | |
| <key>postinstall_script</key> | |
| <string>#!/bin/sh | |
| /usr/bin/python /opt/facebook/bin/add_adobe.py "Default Photoshop CC – 0 GB Configuration" | |
| </string> | |
| <key>requires</key> | |
| <array> | |
| <string>AdobeCreativeCloudDesktopApp</string> | |
| </array> | |
| <key>unattended_install</key> | |
| <true/> | |
| <key>version</key> | |
| <string>1.0</string> | |
| </dict> | |
| </plist> |
Note that Adobe Creative Cloud Desktop App is listed as a requirement. That’s not entirely true, but I think it makes a bit more sense for the user that they get all the pieces they need to actually use the software after clicking the Install button.
I’ve also added in the icon for Photoshop CC, although that’s purely cosmetic.
Add this pkginfo to your repo, run makecatalogs, and try it out! Logs look something like this:
CPE-add_adobe[85246]: Checking to see if nmcspadden@fb.com already has Default Photoshop CC - 0 GB Configuration
CPE-add_adobe[85250]: Adding Default Photoshop CC - 0 GB Configuration entitlement to nmcspadden@fb.com
CPE-add_adobe[85263]: Done.
After that, log into Adobe CCDA and the software will be listed there for installation.
Now Add Them All!
Add one of these pkginfos for each of your product configurations that you want users to select. The end result looks kind of nice:
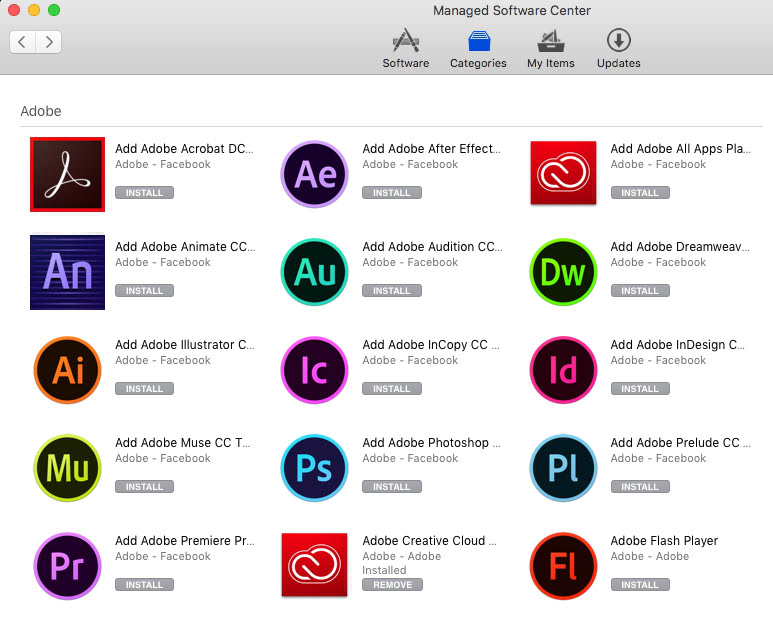
After clicking all of the buttons, CCDA looks very satisfied:

Self-service Adobe CCDA app selection, using Munki and the Adobe User Management API. No more packaging, no more CCP!
Some Caveats and Criticisms
Despite the niftiness of this approach, there’s some issues to be aware of.
The API Key Is A Megaphone
The main problem with this approach is that the API private key has no granular access over what it can and can’t do. The only thing you can’t do with the API private key is make a given user a “System Administrator” on the Enterprise dashboard. But you can add and remove user accounts, add and remove product entitlements to users, and make users product admins of whatever they want.
In most cases, this isn’t a huge deal, but there’s some potential for mischief here. If every single client machine has the private key and necessary config data to make requests to the API, any single client can do something like “remove all users from the domain.” What happens to your data stored in Creative Cloud if your federated ID is removed? I imagine we’d probably prefer not to find out the nuances of having your account removed while using it.
There are some different ideas to address this, though. Instead of storing the key and usermanagement config file on the disk persistently, we could potentially query an endpoint hosted internally for them and use them for the duration of the script. In this theoretical scenario, you could control access to that endpoint, perhaps requiring users to authenticate ahead of time, or logging / controlling access to it.
Throttling Requests
One thing I didn’t mention above at all is that the number of requests in a given time frame need to be throttled. Adobe has great documentation on this, including some exponential back-off code samples. We didn’t implement any of this in this initial proof-of-concept, but if you’re going to roll this to a large production environment, you’ll almost certainly need to handle the return value indicating “too many requests.”
Munki State-Checks
If you wanted to take this further, we could actually turn off OnDemand for these Munki items. Using an installcheck_script, we could query whether or not a given product was added for a given user, and that would change the state of the “Add Photoshop CC To My Panel” to installed, and thus the button in Munki would correspond to “Add or Remove this app from my account.”
Generally, what I suspect is that most users will probably never particularly want to remove a product entitlement from themselves, since it doesn’t actually correspond to what’s installed or not. So changing Munki to reflect state probably doesn’t accomplish too much.
No Way To Trigger Installs
The only major feature request I really wish existed was a way to trigger CCDA into installing a product entitlement. All we can do is add or remove the entitlements to user accounts, but we can’t actually install them for the user (through CCDA).
You could build a Named license package through CCP and actually distribute that directly in your Munki repo, but then you’re essentially back to the same point you were before: you still need to add the entitlement to the user, you still need to package each release / new version of the product, and you still need close to 60 GB (or more!) to store all of the CC packages. About the only thing you’re doing differently compared to serialized licenses is that you don’t have to worry about the serialization package anymore.
You can trigger updates using Remote Update Manager, but that doesn’t provide a mechanism to “Install Photoshop from CCDA.” So no matter what we do, we still rely on the user to log in to CCDA and press the button.
Bandwidth vs. Network
Because this method relies on the user installing from CCDA, that means the Adobe software is being deployed from the Internet. That means internet bandwidth is used to install these, not local network bandwidth. For orgs with smaller internet pipes, this could be significant cost or time sinks.
As I mentioned above, if bandwidth is an issue, you could package up the named licenses with CCP and distribute them via Munki. That would allow you to use your local network bandwidth rather than internet pipes.
Final Summary
Well, it works.


